One of the most expensive things to lose is your iPhone, and this has nothing to do with the cost of the device rather the data it carries. The data within the iPhone doesn’t just encapsulate who you are, and it is an embodiment of your work and several other aspects of your life. You cannot afford to lose these pieces of data to security breaches. Therefore, adequate iPhone security is essential.
It is no secret that Apple has provided iPhone users with several security tools. These tools are potent against nosy sites, hackers, and petty thieves. For this post, we will share some of these tools with you. Follow us on this journey as we will show you how to secure your iPhone.
Enable Find My iPhone
If you just joined the iPhone family, you must be wondering what “Find My iPhone” means. This tool helps you locate your stolen or lost iPhone. It makes use of location or built-in GPS services. Activating it can lock your iPhone remotely and even clear out all your data.
Follow the steps below to activate Find My iPhone.
Step 1: Open “Settings” from your Home screen.
Step 2: Tap on your name.
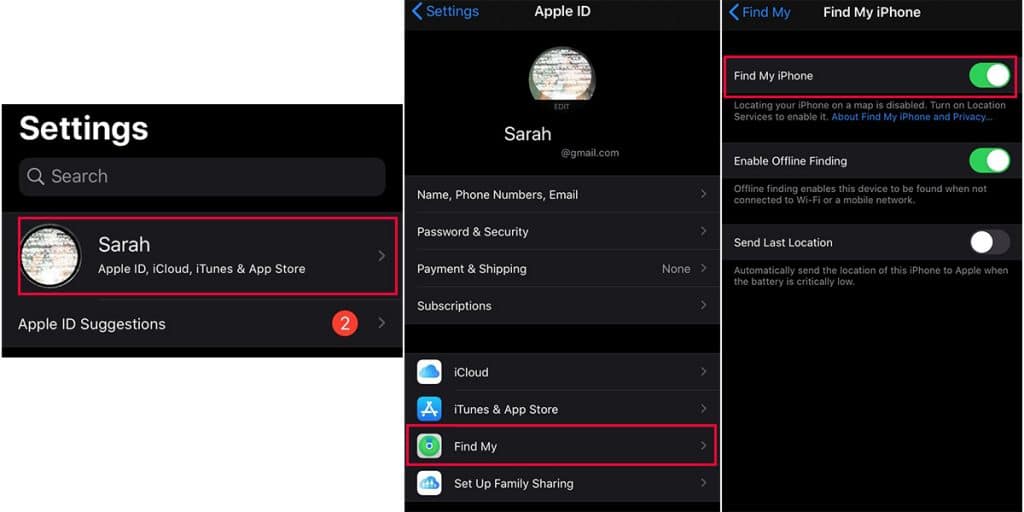
Step 3: Select “Find My”.
Step 4: Check if “Find My iPhone” is “On”.
Step 5: If this feature shows as turned off, tap on the toggle button to activate it.
There you go, you have enabled Find My iPhone on your device, but this is just half of the job. Now you should set this up on any compatible devices you have.
Keep iOS Up to Date
One of the ways to ensure iPhone security is to always keep your iOS up to date. No software system is perfect, and hackers are aware of that. Apple has a team which also tries to hack into its own product. The aim with this is to identify flaws in the operating system before hackers do. When these bugs or flaws get identified, the developer releases a new update to fix it.
Beyond protecting the device constant updates, ensures that the device performs optimally. It also gives you access to more productive tools to enhance the capabilities of your iPhone.
If you are going to update your iOS via your iPhone, you will need an internet connection. It can be through a data connection or via Wi-Fi. It is also crucial that you leave your iPhone plugged in throughout the process. Take the following steps to update your iOS:
Method 1 – Using iPhone
Step 1: Go to “Settings” then select “General”.
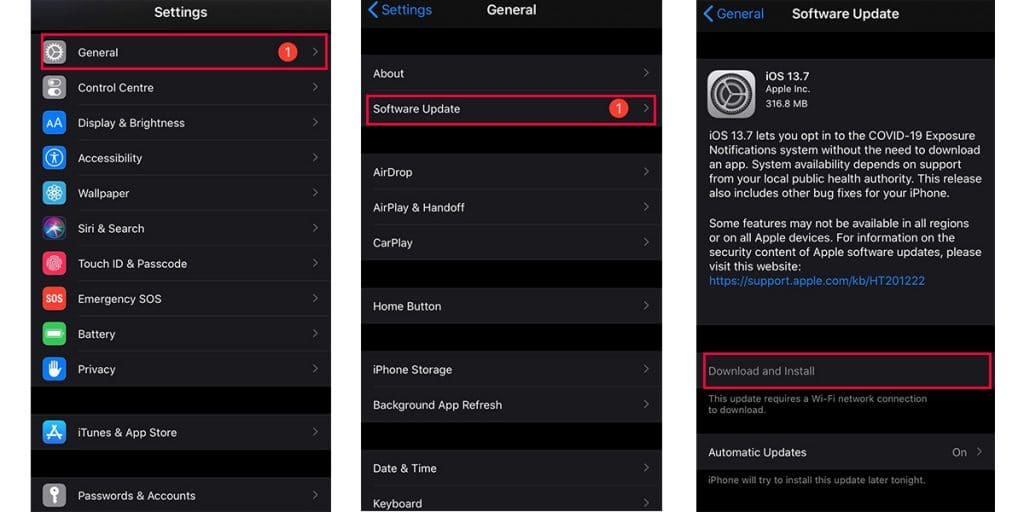
Step 2: Tap on “Software Update”.
Step 3: Tap “Install Now”. If an update exists, you will get a prompt.
Step 4: Tap on “Agree” for the update to begin.
Note that immediately after the update, the phone will restart.
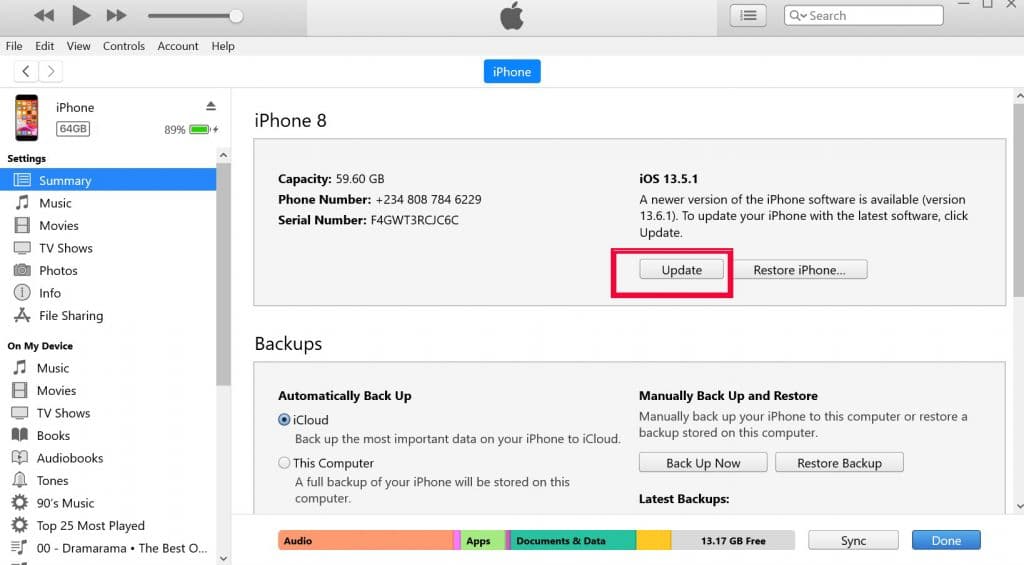
Method 2 – Using iTunes
Another method of updating your iOS is through iTunes. To do this, follow the steps below:
Step 1: Connect the device to your PC using a USB cable.
Step 2: Open iTunes
Step 3: Select your device icon

Step 4: Select “Check for updates” or “Update”.
Keep Your Apps Updated
Constant app updates are one of the iOS security tip many people neglect. It isn’t just about the fun you get from the different new features. Updating your apps ensures that you fix bugs and enjoy more security.
There are three ways to keep your apps updated, and we explain them below:
Method 1: Update Apps Using the App Store
The easiest way to update your iPhone apps is through the App Store. To use this method:
Step 1: Open the “App Store” from your Home Screen
Step 2: Select your “Profile Image” on the top right of the screen.
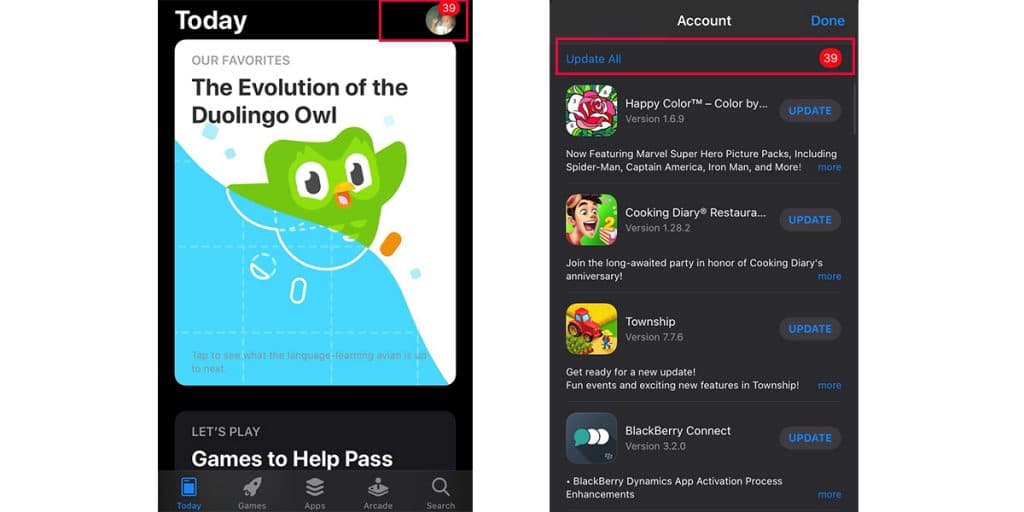
Step 3: Select “Update All”.
The above steps will ensure that all apps that need updating get updated. On the other hand, you can also choose to update specific apps.
Method 2: Enable Automatic Updates
Another helpful way is to enable automatic updates. This feature has been present on iPhones since the release of iOS 7. To use this method:
Step 1: Open “Settings”
Step 2: Tap on “iTunes & App Store.”
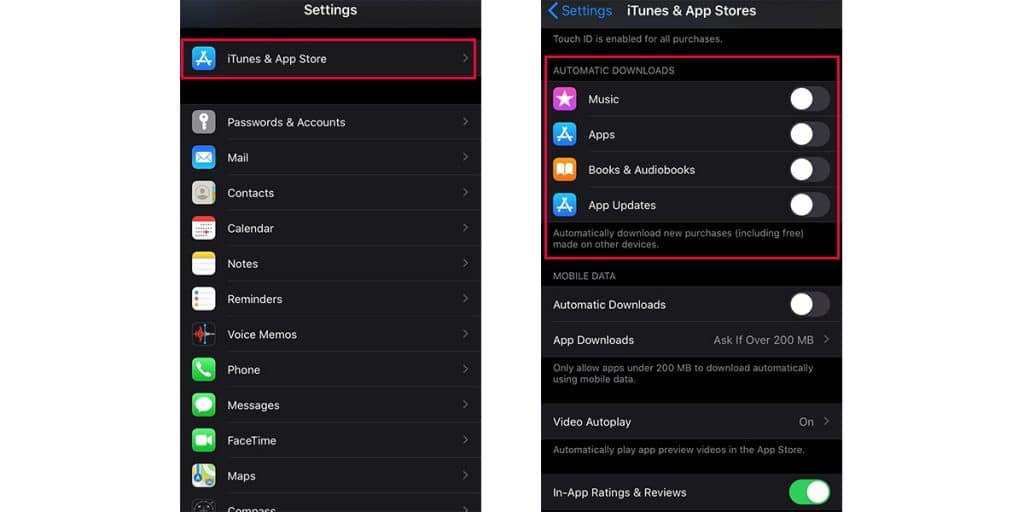
Step 3: Scroll down to the “Automatic Downloads” menu
Step 4: Tap on the “App Updates” toggle button to enable it. It will update apps automatically.
Note that you can switch off “using cellular data for updates” to save your mobile data. Simply adjust the settings to download updates only using Wi-Fi.
Method 3 – Update Apps Using iTunes v12.6 or older
The final method of updating your apps is through iTunes. However, you should know that if your iTunes version is 12.7 or newer, then this method won’t be available for use. To use this method, take the following steps:
Step 1: Open iTunes v12.6 or later and click on “Apps”.
Step 2: Click “Updates” to see a list of your apps that need updating.

Step 3: Choose the app you need to update and click “Update”.
Use a Truly Random Passcode
Your passcode is the gateway to your iPhone and one of the ways you can learn how to secure your iPhone. Here are some helpful passcode tips:
- Avoid using standard numbers.
- Convert words to numbers. That is, think of a word and check for the number they are paired with on your keypad.
- Choose an alphanumeric passcode instead.
- Stay away from dictionary words.
- Employ a passphrase.
- Change passcodes often.
The benefit of this is that you make it difficult for hackers to gain access to your iPhone. To set a passcode or change your old passcode, follow these steps:
Step 1: Navigate to “Settings” from the Home Screen.

Step 2: Scroll down for the option of “Touch ID & Passcode” for iPhone 5S to iPhone 8 or “Face ID & Passcode” for iPhone X and above.
Step 3: If you have an old passcode, enter it. Note that you won’t be allowed to change your passcode unless you provide the old one.
Step 4: Select “Change Passcode”
Step 5: Provide “Old Passcode”
Step 6: If you want your new passcode to be purely numeric, then fill in the bar. However, if you want an alphanumeric passcode, select “Passcode Options” to use a “Custom Alphanumeric Code”.
Use Touch ID or Face ID
Even though hackers have sometimes fooled touch or face ID systems, they are still pretty safe. At least, they present you with an extra layer of protection. This way, it takes more time to break through your phone defenses. Use the following steps to enable Touch ID & Face ID on your iPhone device.
Option 1 – Enable Touch ID
In 2013, Apple introduced Touch ID with the iPhone 5s, so if you have a model before the 5s, you won’t be able to activate this option.
Step 1: Navigate to “Settings” from the Home Screen.
Step 2: Swipe down for the option of “Touch ID & Passcode.”
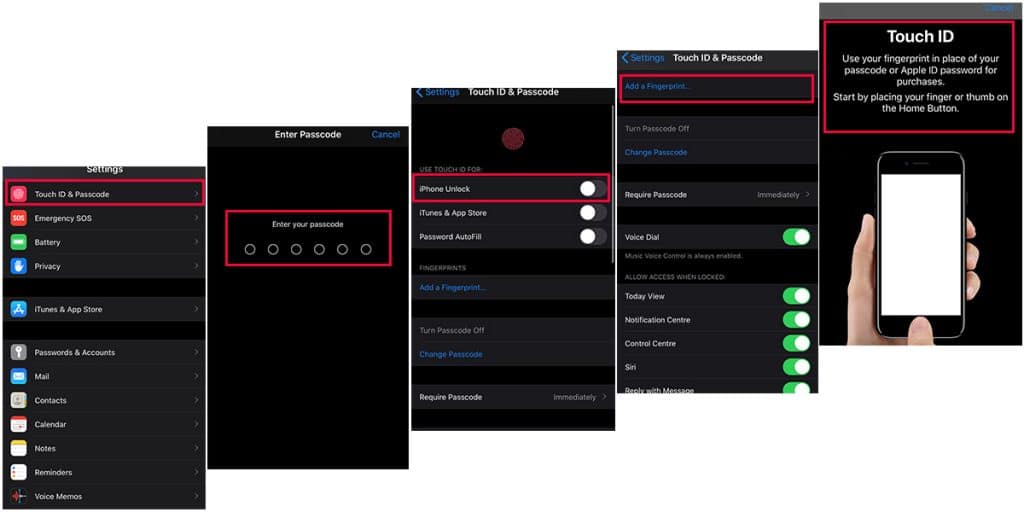
Step 3: If you have a passcode, enter it. Note that you won’t be allowed to access the Touch ID option until you provide the passcode.
Step 4: Enable Touch ID for “iPhone Unlock” by ensuring the toggle button shows Green.
Step 5: Tap “Add a Fingerprint”
Step 6: Follow the on-screen instructions to store your fingerprint data on the iPhone.
Note that you can add more than one fingerprint data to your device. You can also enable Touch ID for iTunes & App Store or Password Autofill.
Option 2 – Enable Face ID
Apple introduced the Face ID option in 2017 with the release of the iPhone X. Earlier iPhone models do not have the technology to enable this feature.
Step 1: Navigate to “Settings” from the Home Screen.
Step 2: Swipe down for the option of “Face ID & Passcode.”
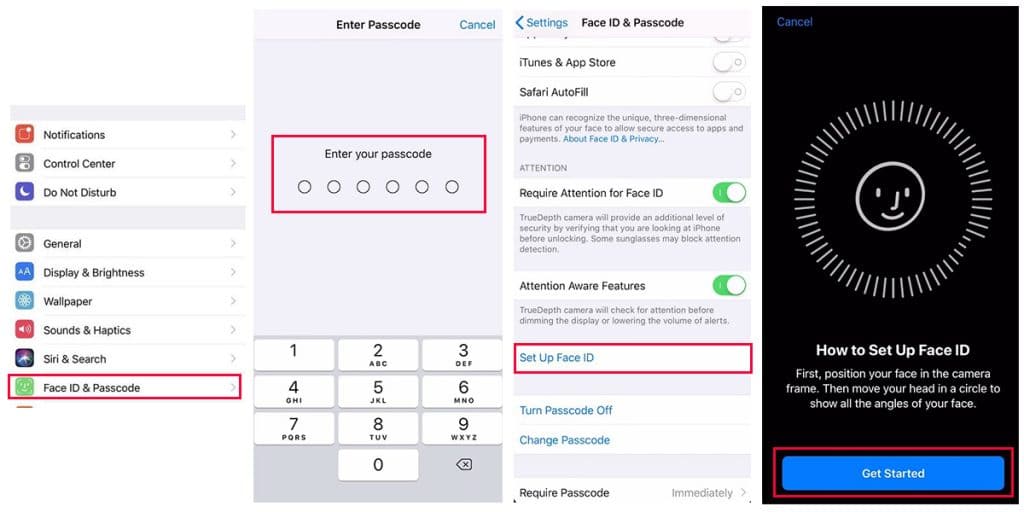
Step 3: If you have a passcode, enter it. Note that you won’t be allowed to access the Face ID option until you provide the passcode.
Step 4: Enable Face ID for “iPhone Unlock” by ensuring the toggle button shows Green.
Step 5: Follow the on-screen instructions to store your face data on the iPhone.
You can also enable Face ID for iTunes & App Store, Apple Pay or Safari Autofill.
Turn on USB restricted mode.
You can turn this on under the passcode settings. With this feature enabled, the iPhone does not permit USB accessories. The advantage of this is that you protect your device from malware that may creep in via the USB port.
Step 1: Navigate to “Settings” from the Home Screen.
Step 2: Swipe down for the option for “Touch ID & Passcode” for iPhone 5S to iPhone 8 or “Face ID & Passcode” for iPhone X and above.
Step 3: Enter your passcode.
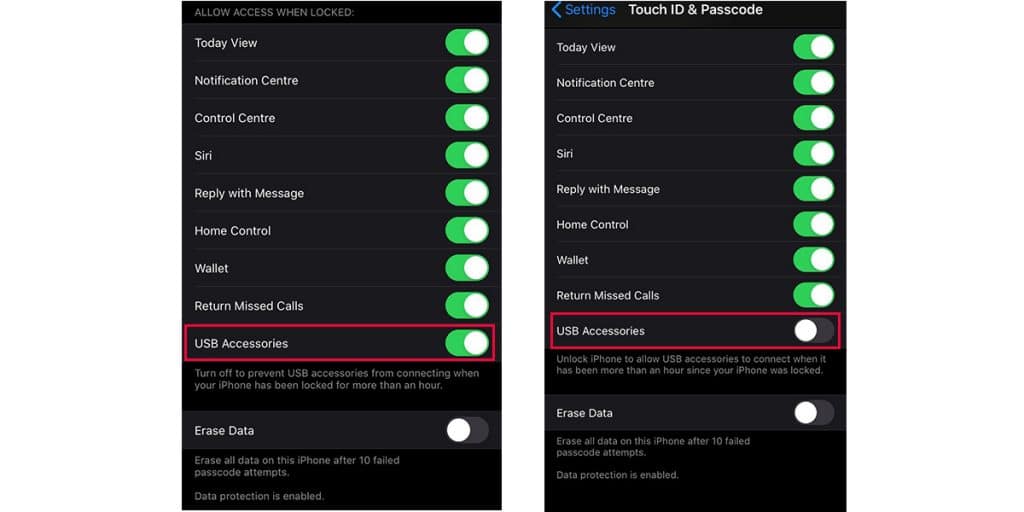
Step 4: Swipe down till you see a tray titled “Allow Access When Locked.”
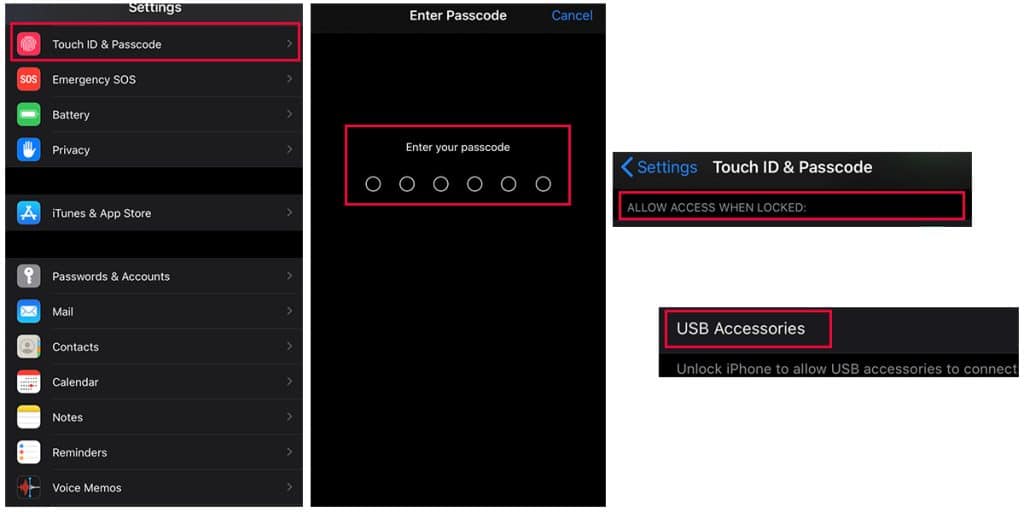
Step 5: Look for the option “USB Accessories.”
Step 6: If the toggle is “Off”/ “Black”, it means anyone with your iPhone needs to unlock it to allow USB accessories connect. However, if it is “On”/ “Green”, your device can be connected to USB accessories when locked.
Auto-wipe iPhone content
Auto-wiping is an essential tip for when you lose your iPhone or any iOS device. You can do this using two methods:
Option 1 – Use Passcode
Hackers or thieves will try to gain access to your phone by guessing your passcode. iPhone has an option which erases the data on your device after ten failed attempts. Here’s how to enable the feature:
Step 1: Navigate to “Settings” from the Home Screen.
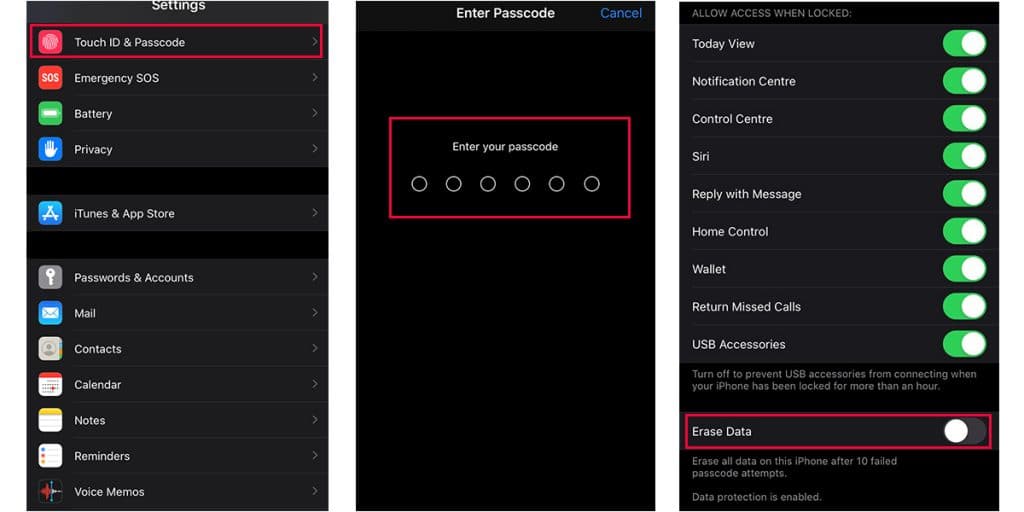
Step 2: Swipe down for the option of “Touch ID & Passcode” for iPhone 5S to iPhone 8 or “Face ID & Passcode” for iPhone X and above.
Step 3: Enter your passcode.
Step 4: Scroll down till you see an option titled “Erase Data.”
Step 5: Tap the toggle to enable the option.
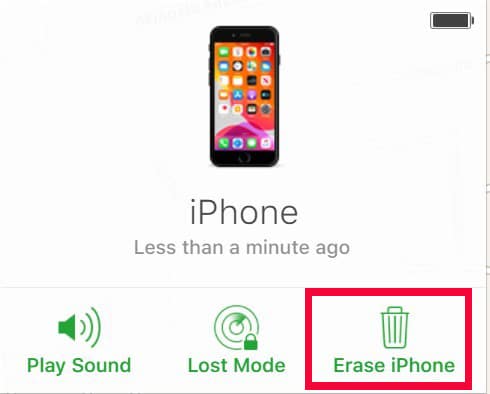
Option 2 – Find My iPhone.
To make use of this method, you need to enable Location Services on your phone, and turn on Find My iPhone.
Step 1: Log in to iCloud from any internet-enabled device.
Step 2: Select the “Find My iPhone” option.
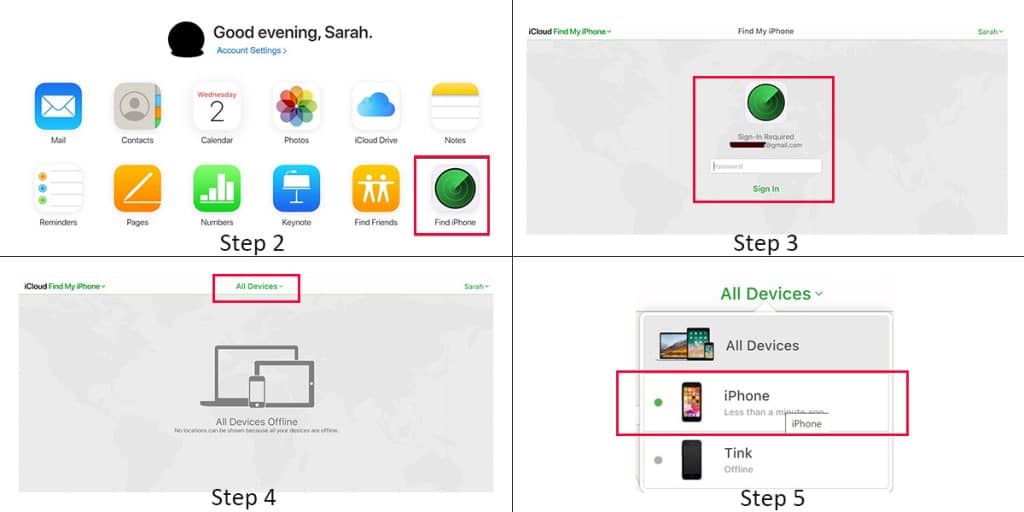
Step 3: Enter your iCloud password.
Step 4: Navigate to the “All Devices” page and click the drop-down menu.
Step 5: Select your iPhone device from the options displayed.
Step 6: Click the “Erase iPhone” option
Wipe Clean Before Selling
One important iPhone security tip you should consider when you need to pass the device on is to ensure all personal data gets removed. Once you back up the iPhone, wipe all the content before handing it out using the following steps:
Step 1: Access “Settings” from your Home Screen
Step 2: Scroll down till you see “Sign Out.”
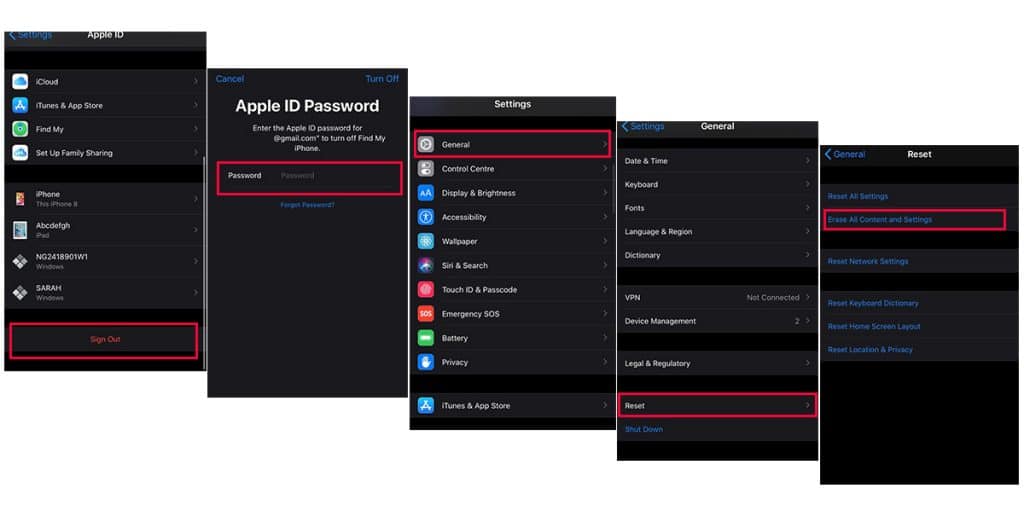
Step 3: Input your “Apple ID Password”
Step 4: Tap the “Turn Off” option.
Step 5: Navigate to the main “Settings” menu.
Step 6: Tap “General”.
Step 7: Tap the “Reset” button.
Step 8: Select “Erase All Content and Settings.”
Don’t Auto-Join Wi-Fi Networks.
Have you ever heard of a “Man in the middle” attack? It is one of the risks of auto-joining Wi-Fi networks. What happens here is that the hacker tricks you by masking a rogue system as one that you know.
Always turn off the auto-join feature for any new network that you join. It bars the hacker from making use of the same SSID of your favourite network to lay hands on your data. You can use the options below to prevent auto-joining:
Option 1 – Ask to Join Networks
Step 1: Go to “Settings”
Step 2: Tap on “Wi-Fi”
Step 3: Toggle Wi-Fi “On”
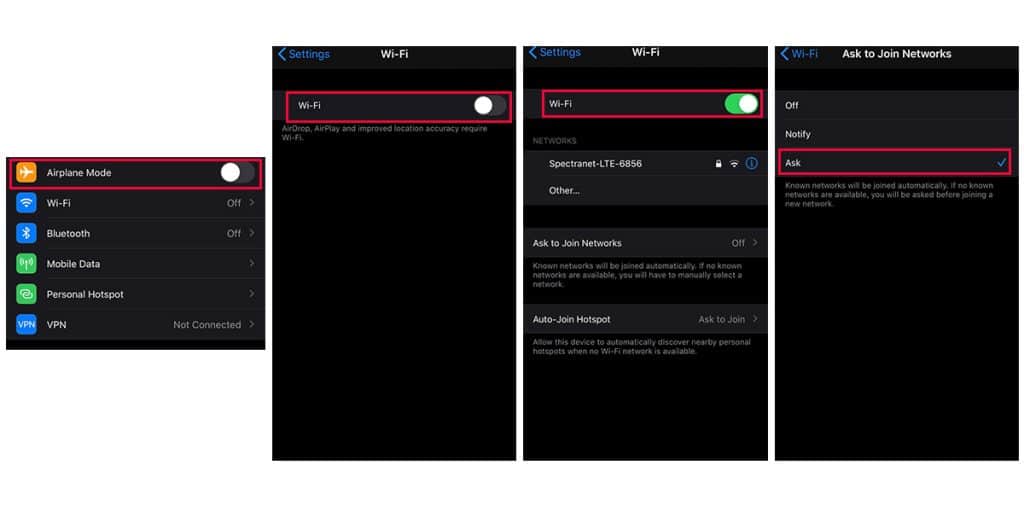
Step 4: Scroll down to the “Ask to Join Networks” field and tap it
Step 5: Choose the “Ask” option to ensure your phone asks before joining any available network.
Option 2 – Prevent Auto – Join
Step 1: Go to “Settings” from your home screen.
Step 2: Tap “Wi-Fi”.
Step 3: Scroll to you see your network name and connect.
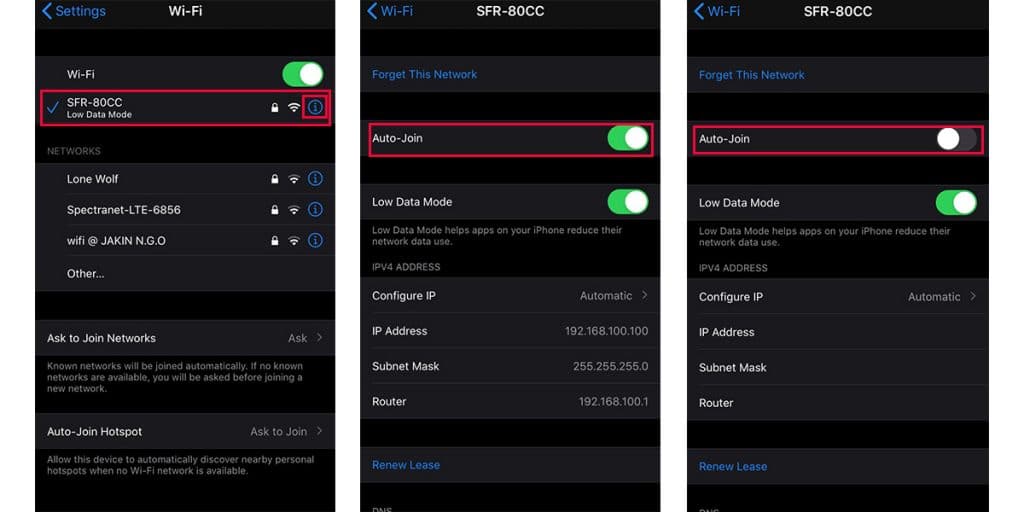
Step 4: Tap the “i” option beside the network name.
Step 5: Check if the “Auto-Join” option is enabled.
Step 6: Tap the toggle to turn off auto-join.
Use a VPN on Public Wi-Fi
VPN is an acronym for Virtual Private Network. VPN is regarded by many as an internet connection bulletproof vest. Using this helps to encrypt data exchanged through a network.
When you use this on a public Wi-Fi, you protect yourself from hackers that may be on the network. It saves you from potential attacks and keeps your iPhone secure as well.
Step 1: Tap on “Settings” from your home screen.
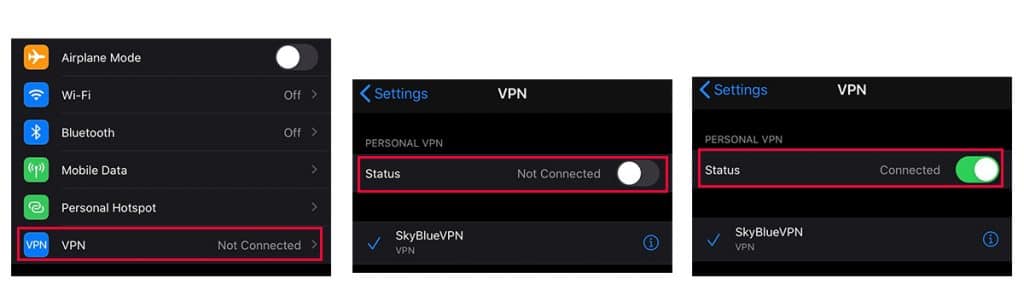
Step 2: Select “VPN.”
Step 3: Tap the “VPN Status” to connect.
Set up Two-Factor Authentication
Two-factor authentication helps provide an extra security layer to your Apple accounts. With this, even if another individual knows your passcode, they can’t access the data on your phone. Here’s how to set it up:
Step 1: Go to “Settings.”
Step 2: Tap your “Account Name.”
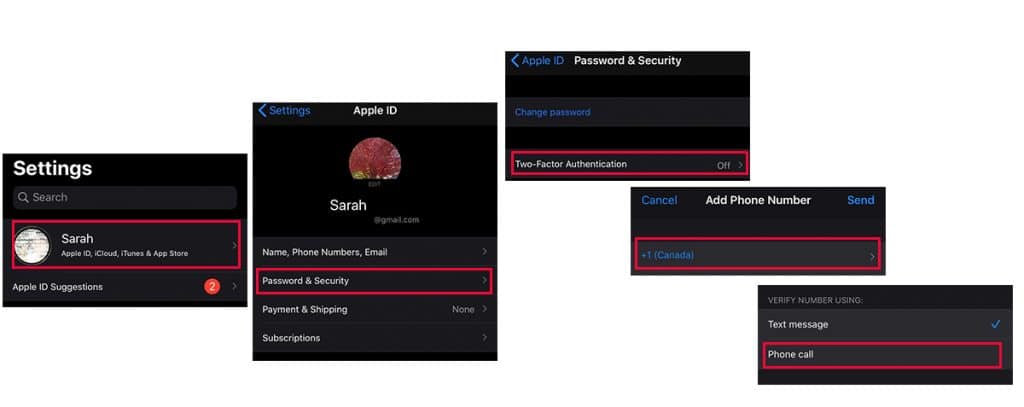
Step 3: Select “Password & Security.”
Step 4: Check if “Two-Factor Authentication” is On. If not, tap to turn it on.
Step 5: Answer the security questions that pop up.
Step 6: Input the “Phone Number” where you want verification codes sent.
Step 7: Choose the option of receiving your code via “Phone Call.”
Step 8: Wait for the call from Apple then enter the verification code to turn on two-factor authentication.
Avoid using SMS for two-factor authentication
One of the ways to get your two-factor authentication (2-FA) is through SMS. While this is very easy, it isn’t so safe. Hackers can make use of a method called SIM swap to trick carriers into porting a phone number to a new device. If this happens, it means they can gain access to your 2-FA codes.
Make Sure Your iPhone Screen Locks Quickly
Why should you care how long it will take for your iPhone screen to lock? After all, it still locks anyway. The truth is that the window period before the screen locks may just be enough for anyone to gain access to your phone. With quicker lock times, you protect your device better.
Here’s how to set up quicker lock times for your device:
Step 1: Open “Settings”
Step 2: Scroll down till you see “Display & Brightness.”
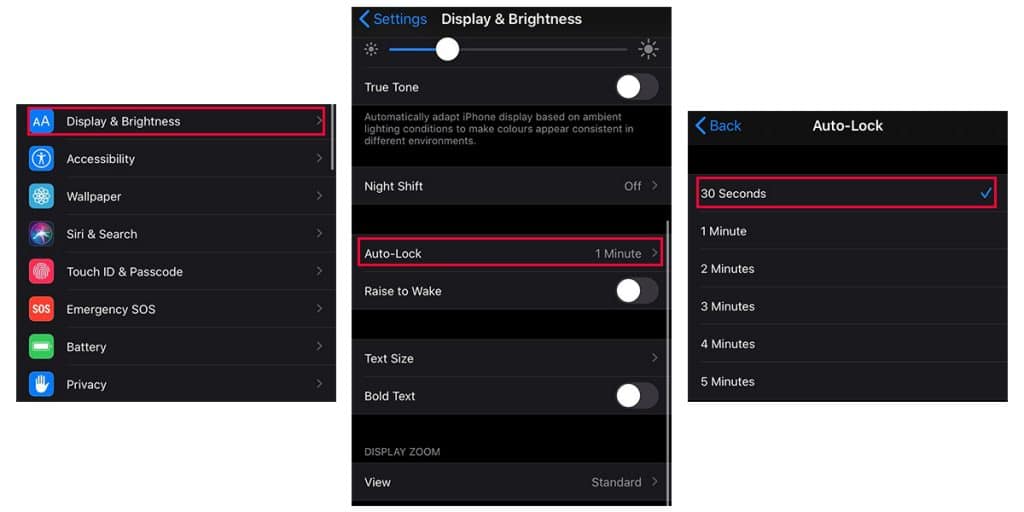
Step 3: Tap “Auto-Lock”
Step 4: Select “30 seconds” for a faster lock time.
Disable Lock Screen Options
Lock screen options make it possible to access a specific feature of the iPhone without unlocking it. Despite the convenience that they bring to the table, it is best to disable them. With your lock screen options enabled, anyone can still have access to certain features on your device. Here’s how to set it up:
Step 1: Open the “Settings” option from Home Screen
Step 2: Swipe down for the option for “Touch ID & Passcode” for iPhone 5S to iPhone 8 or “Face ID & Passcode” for iPhone X and above.
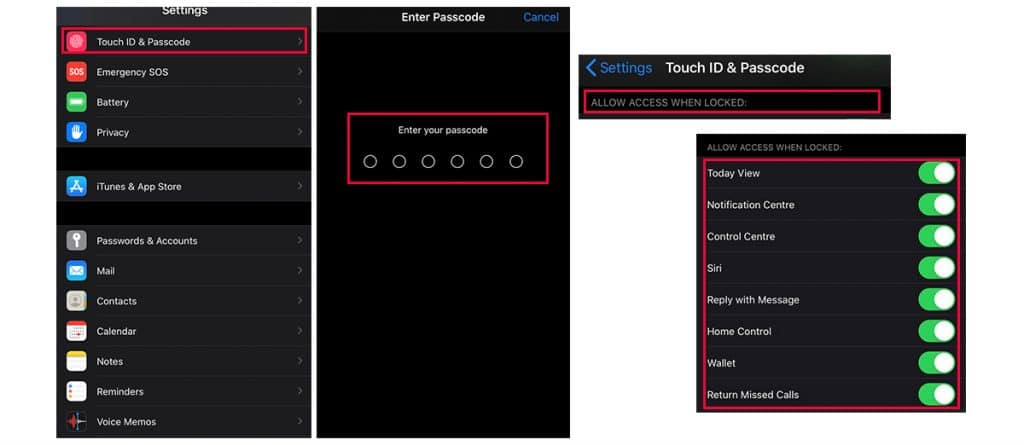
Step 3: Enter your passcode.
Step 4: Scroll down for a tray titled “Allow Access When Locked.”
Step 5: Look for the options that have the toggle “On/Green.”
Step 6: If the toggle is “Off”/” Black”, it means anyone with your iPhone needs to unlock it to access those options. However, if it is “On”/” Green”, your device does not need unlocking to access those features.
Monitor your Privacy Settings
Different apps on your iPhone seek to pry into your privacy. Many times, these apps need you to provide access to your location, messages, phone contacts, etc. In recent times, we have seen several issues arise with data breaches and unscrupulous companies.
To protect yourself from all of this, you should monitor your privacy frequently. Some gateways you must be wary of include:
- Microphone
- Contact
- Camera
Here’s how you can control the apps that have access to your private data:
Step 1: Open “Settings”
Step 2: Scroll down and stop on the “Privacy” option
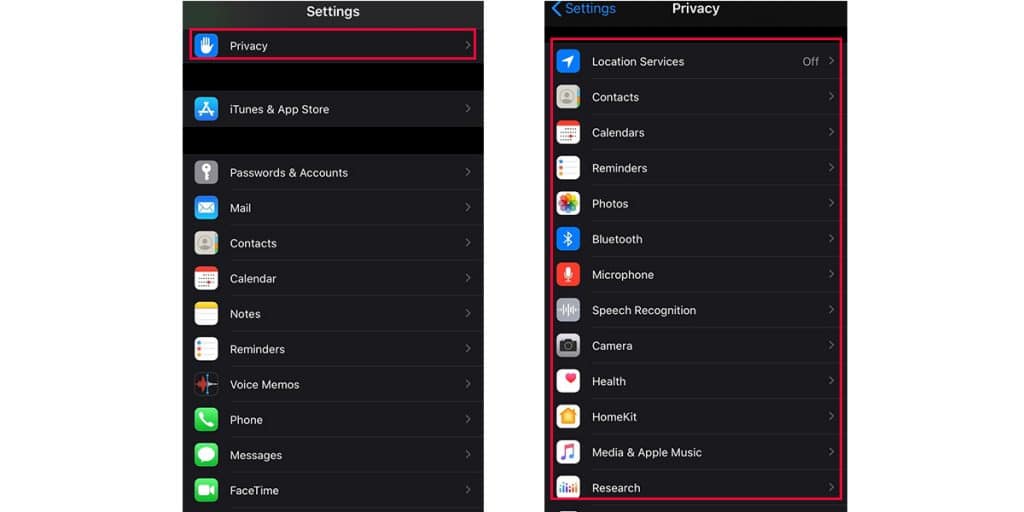
Step 3: Select from the options displayed to control the apps that have access to your contacts, microphone, calendar etc.
Don’t Share Location Data in Images
This tip is as much of an iOS security measure as it is a self-protection measure. It might be interesting to share your location data with your friends. The question you should ask yourself is this, who else is watching? We advise that you take this precaution even on social media. Here’s how to disable sharing your location data:
Step 1: Open “Settings”
Step 2: Scroll down till you see the “Privacy” displayed option
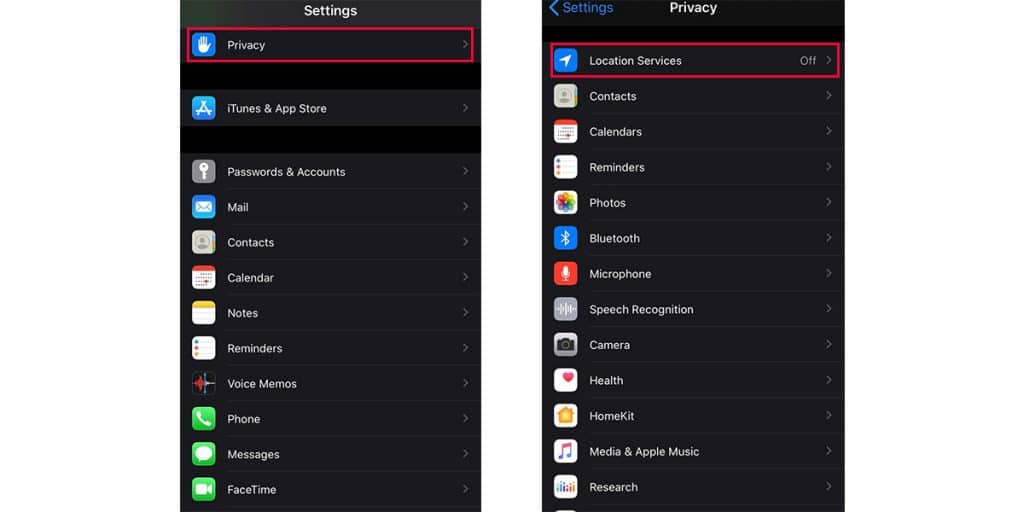
Step 3: Select “Location Services” from the options
Step 4: If the toggle is “On”, tap it to turn it “Off.”
Or
Step 5: Scroll down within Location Services
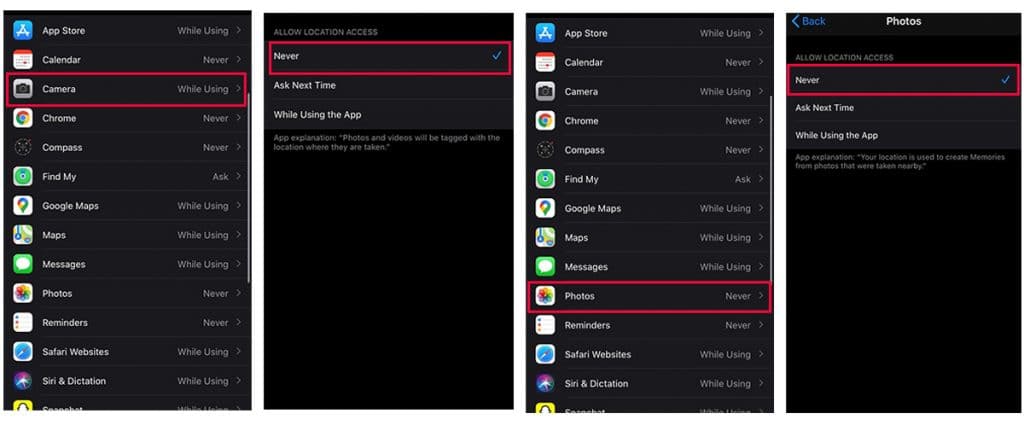
Step 6: Tap on “Camera”
Step 7: Change the option for Allow Location Access to “Never.”
Step 8: Scroll down within Location Services
Step 9: Tap on “Photos”
Step 10: Change the option for Allow Location Access to “Never.”
Turn Off Siri
Why would we even suggest that you turn off Siri? Siri brings so much to the table. Well, what so many people don’t know is that Siri gives access to your iPhone in the lock screen.
Although users have the option to train Siri to be voice-sensitive, your phone is still vulnerable if someone else manages to mimic you. Here’s how to turn off Siri:
Step 1: Open “Settings” option from Home screen.
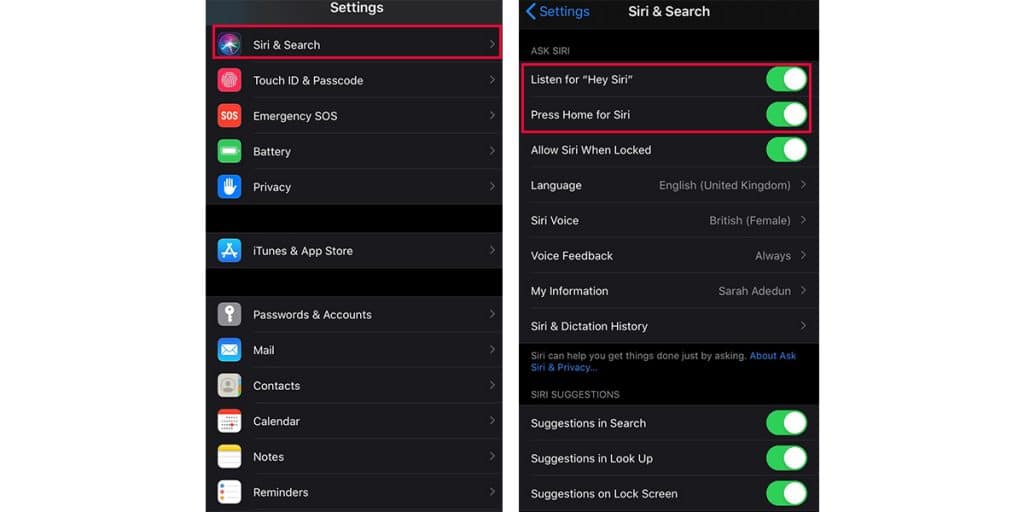
Step 2: Swipe down for the “Siri & Search” option.
Step 3: Turn off all enabled options for Siri such as “Listen for Hey Siri” and “Press Home for Siri.”
Turn Off AutoFill
The autofill function on the iPhone provides convenience to iPhone users as it makes it easy for data to be stored and recalled to fill forms when needed. Instead of manually having to retype the data, the phone remembers it and provides the option for users to fill requested information automatically. However, this convenience can become a security risk.
The problem is that with this feature on, other people may have access to your data, especially login details quickly. You can turn this feature off by:
Step 1: Go to the “Settings” menu.
Step 2: Tap the “Safari” option.
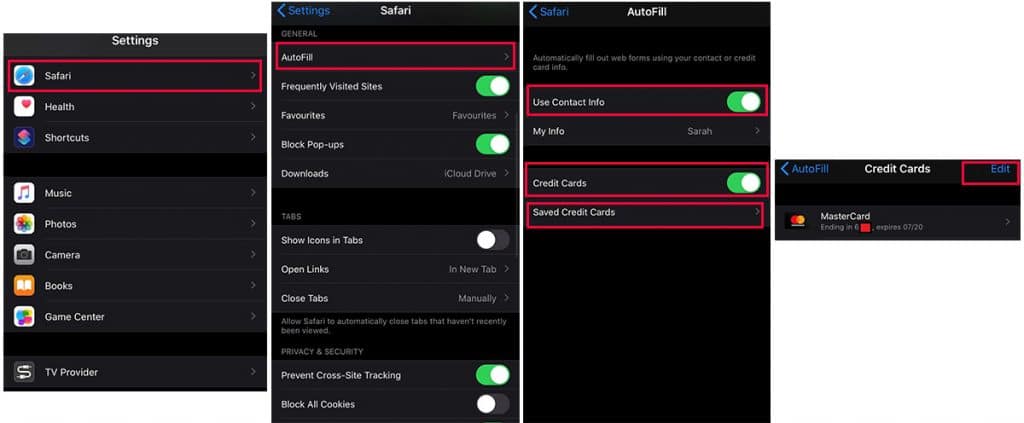
Step 3: Select “AutoFill”.
Step 4: Tap the buttons for “Use Contact Info” & “Credit Cards” to turn off autofill.
Step 5: Tap “Saved Credit Cards” and tap the “Edit” button to delete all credit card information.
Use A Password Manager
Still, want to know more on how to secure your iPhone? One of the best methods is to make use of the iPhone password manager – iCloud Keychain. Using this tool helps you to create strong passwords and save them securely. Here’s how to access it if your iPhone has iOS 7.0 or higher:
Step 1: Tap “Settings” from your home screen.
Step 2: Tap your “Account Name”.
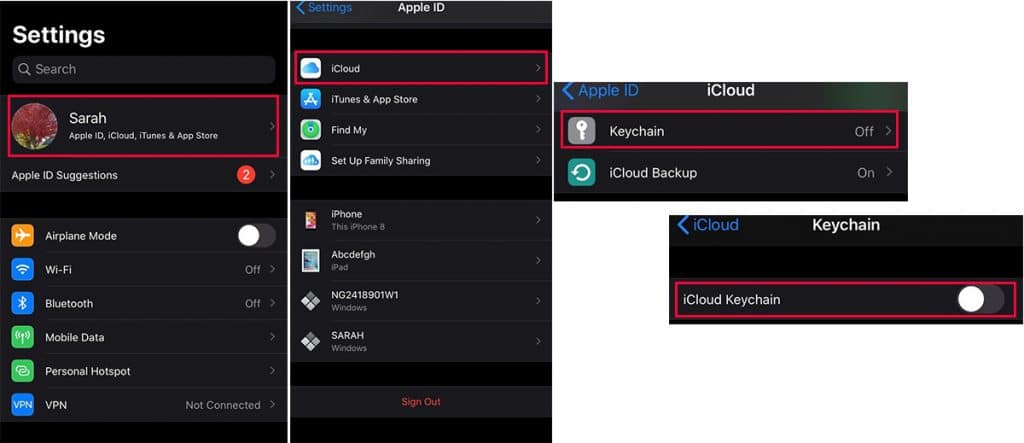
Step 3: Select “iCloud.”
Step 4: Scroll down till you see “Keychain.”
Step 5: Tap the toggle to “Turn On” Keychain. You may need to enter your passcode.
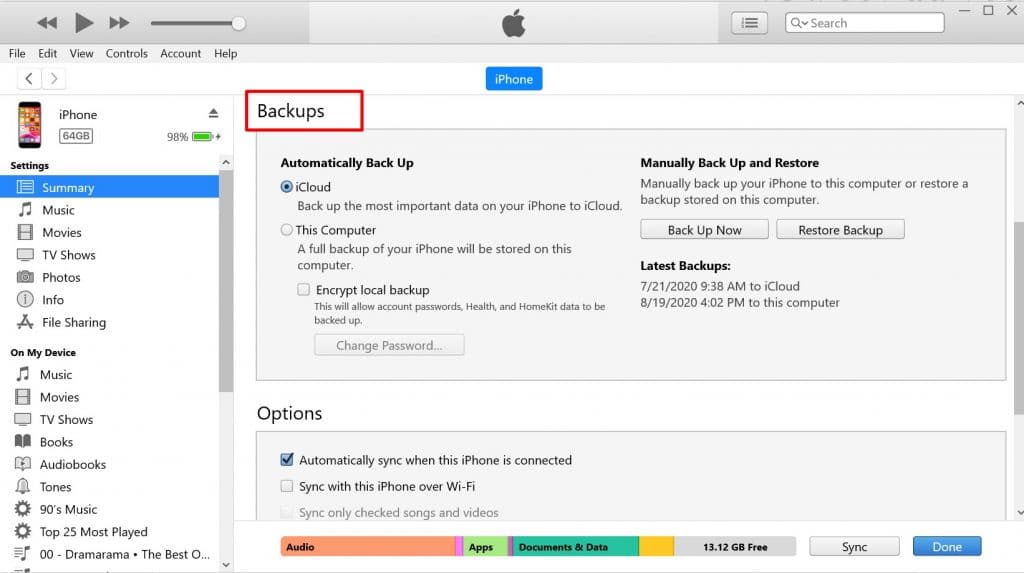
Make Encrypted iPhone Backups
Encrypted backups are one of the most critical iOS security measures you should consider. With this, you can protect personal information, including contact info and email passwords.
Using this measure also prevents access to the location of the backup on your device. Use the following steps to encrypt your backup:
Step 1: Connect your iPhone using a USB cable to a PC or Mac.
Step 2: Open iTunes
Step 3: Locate the device icon and select it.
Step 4: Scroll down to the field for “Backups” From here, you can encrypt your backup by setting a password.
Step 5: Select Automatically Back Up “This Computer”
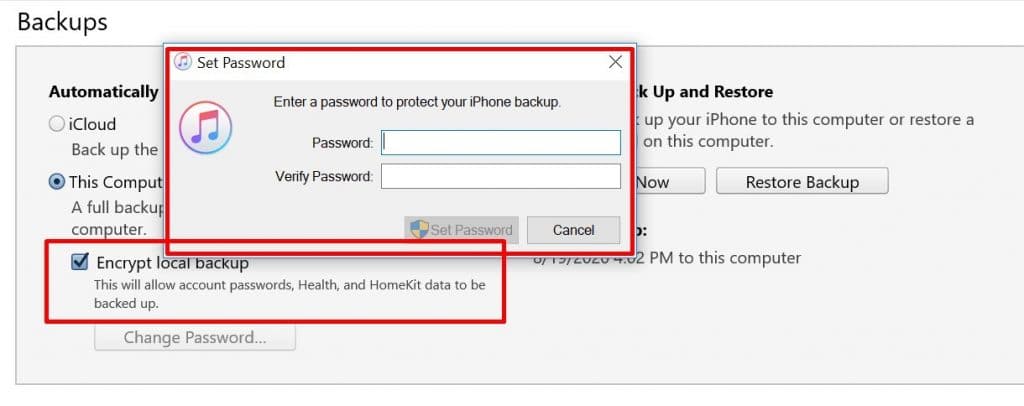
Step 6: Tick “Encrypt local backup” and enter a password to protect the backup
Protect your SIM with a PIN
SIM PIN is another essential security measure to take. With a PIN on your SIM, even if your iPhone gets missing, no one else can use the SIM. Here’s how to activate SIM PIN:
Step 1: Go to “Settings”
Step 2: Tap on “Mobile Data”
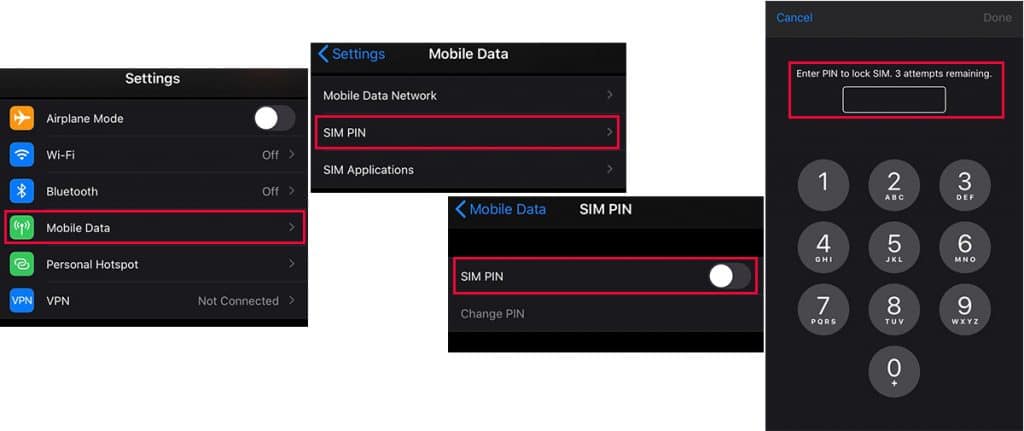
Step 3: Scroll down till you see “SIM PIN.”
Step 4: Tap on the toggle to turn on the SIM PIN.
Step 5: Insert PIN to start the activate it.
Be Wary of Fake Apps
The Apple App Store has different applications, but how do you know which ones are genuine? While some fake apps might survive purely on ad generated revenue, other apps exist to gain information on customer credit cards. Here’s how to reduce the likelihood of downloading fake apps on your device:
- Check developer/publisher name
- Read the reviews
- Look out for the publishing date
- Read the description and title for grammar errors
Disable “Load Remote Images” In Email Settings
Load Remote Images is an option on the Mail app of your iPhone. It is enabled by default so that your devices load remote images when reading emails. Leaving this enabled means that the senders can track when you download the pictures and even gather your personal information.
Here’s how to disable the feature:
Step 1: Go to “Settings”
Step 2: Tap on “Mail”

Step 3: Scroll down to the “Messages” tray
Step 4: Tap on Load Remote Images and disable the option.
By the way, doing this also helps you save data and makes emails load faster.
Use Airplane Mode
One important iPhone security technique is to make use of airplane mode when your phone is not in use. Why is this important? Well, it is simple! When your device is on airplane mode, the lower the chances of getting hacked. The same goes for when the phone is entirely powered off. So when next you are thinking of having a quiet time, you can as well activate airplane mode. Here’s how to do so:
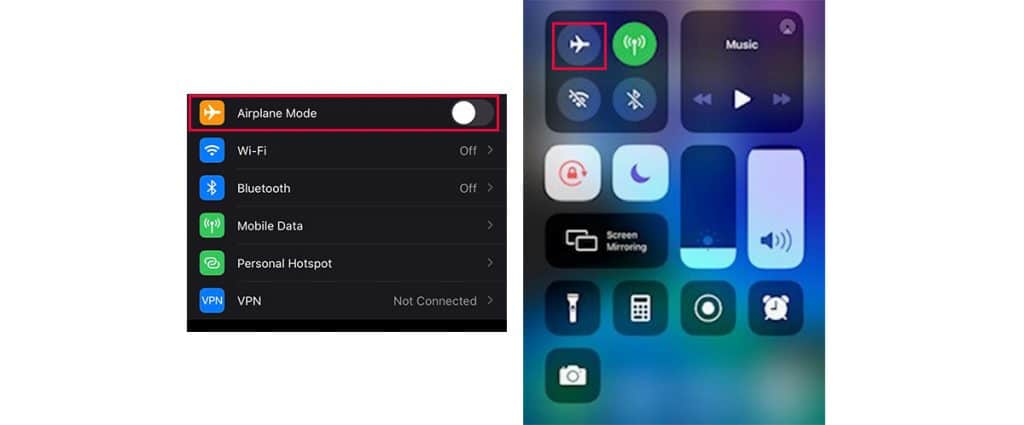
Step 1: Navigate to “Settings”
Step 2: Tap the Toggle to “Activate” Airplane Mode.
Or
Step 3: Make a swipe up motion from the bottom of your screen to show “Control Centre.”
Step 4: Tap the symbol for Airplane Mode to activate it
Use an Antivirus App
When you make use of an antivirus app, it protects your device from different kinds of attacks. Such attacks include phishing and malware attacks. If you don’t do this, you put your device at risk of affecting several functions on your device. It is even possible to lose some critical pieces of data. To get an antivirus app, use the following steps:
Step 1: Select “App Store” from the home screen
Step 2: Tap “Search” icon at the bottom of the screen
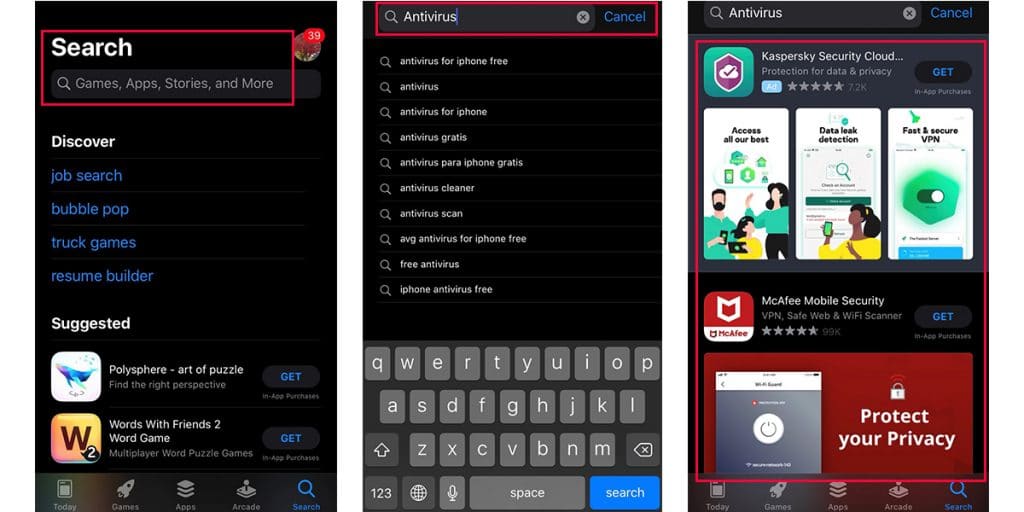
Step 3: Type “Antivirus” into the search bar
Step 4: Read the results and select a preferred option.
Turn Off Automatic Sync To iCloud
Automatically syncing your data to iCloud may be convenient but at the same time dangerous. In 2014, hackers gained access to the iClouds of popular actresses and subsequently released sensitive images stored in them. To prevent a similar situation occurring to you, disable automatic sync iCloud option:
Step 1: Go to “Settings”
Step 2: Tap on your “Account Name”
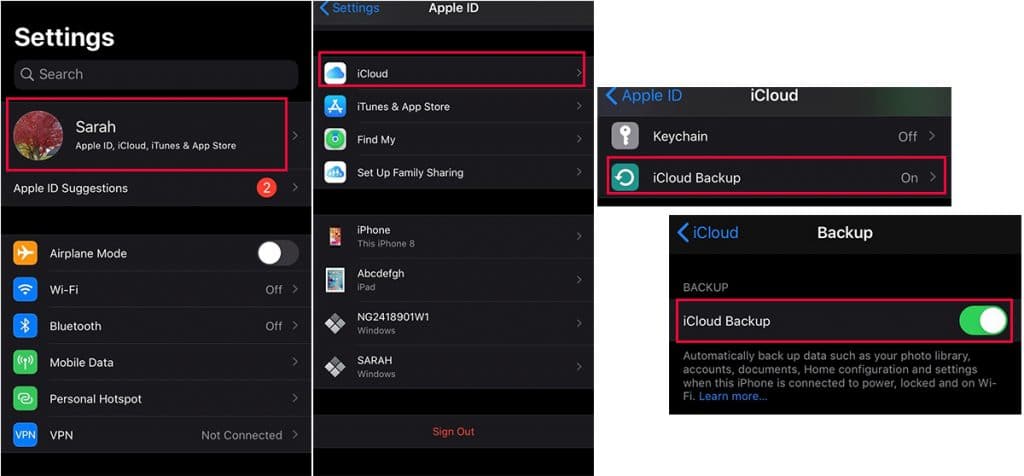
Step 3: Select “iCloud.”
Step 4: Scroll down till you see “iCloud Backup.”
Step 5: Tap the toggle to “Turn Off” automatic backup.
Turn Off Cookies in Your Browsers
Turning off cookies is another significant iOS security measure you should adopt. Asides making browsers run faster and saving space, turning off cookies in your browsers also fixes bugs. More importantly, doing this protects you from making personal information accessible to hackers. Here’s how to disable the cookies:
Step 1: Go to the “Settings” menu.
Step 2: Tap the “Safari” option.
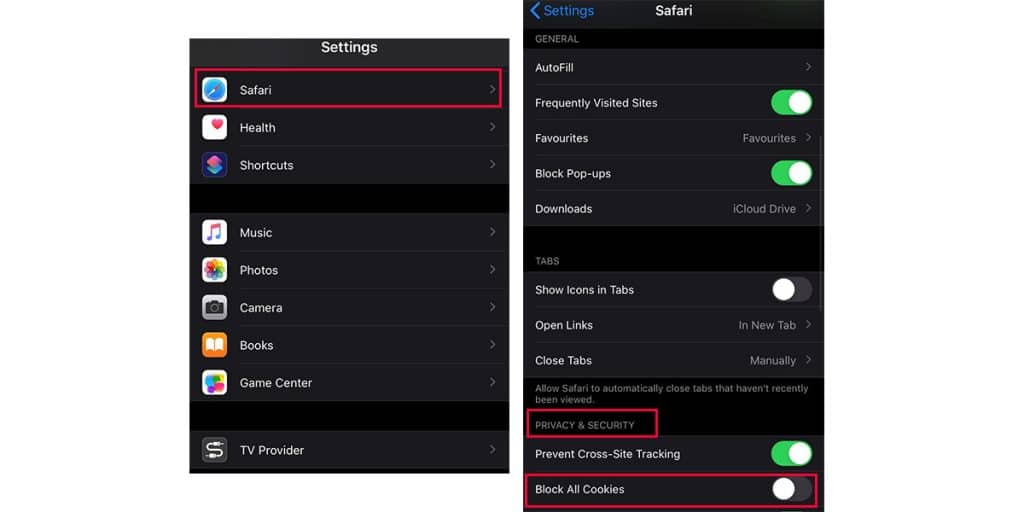
Step 3: Scroll to the “Privacy & Security” tray.
Step 4: Tap the button for “Block All Cookies” to turn off cookies
Hide Notification Previews
With this option, you can restrict the content of your notifications from being viewed. To do this:
Step 1: Go to your “Settings” app.
Step 2: Tap on “Notifications”
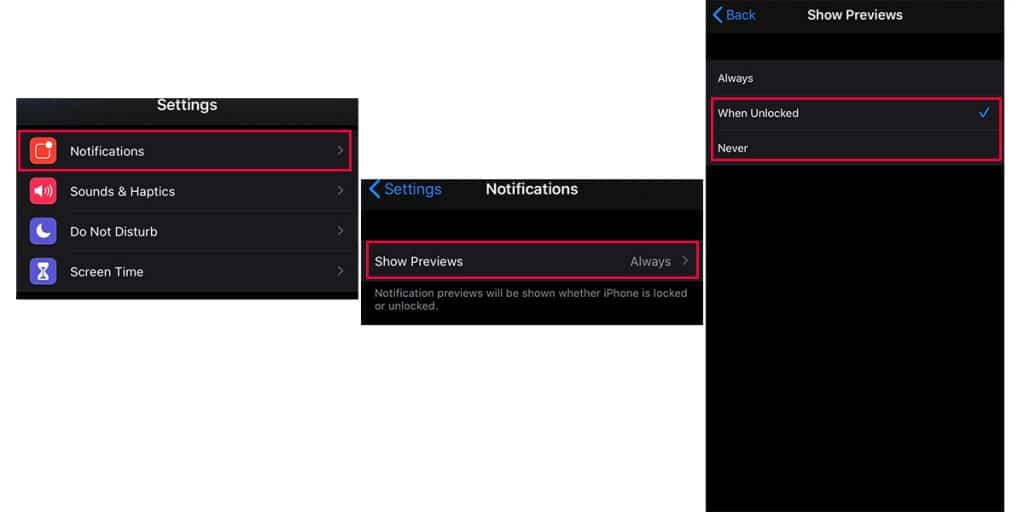
Step 3: Tap “Show Previews”
Step 4: Select “When Unlocked” or “Never”
Don’t Jailbreak Your iPhone
It is a simple unwritten rule, never jailbreak your iPhone. Also, don’t download apps that aren’t on the App Store. Jailbreaking your device takes away the security measures which the phone manufacturer has installed, thereby making it susceptible to malware and hackers.
Avoid Opening Unknown Links
One of the popular ways that hackers gain access to your device is by enticing you to click an unknown link. Such links can come through emails or even text messages. Make sure that you investigate such links before clicking them.
Conclusion
With the 30 tips we showed you above, securing your iPhone should be a breeze. Which ones do you already use and which ones do you think we left out? Leave a comment below!

