If you need to fix iPhone cameras, know that the iPhone camera not usually problematic. It is always in contention for the best mobile device camera every single year. The brilliance of iPhone cameras is sometimes the factor that persuades people to purchase these smartphones. Apparently, it’s not all great because some iPhones can develop issues with the camera, and due to that, they notice their iPhone front/back camera not working.
Repairing a malfunctioning iPhone camera is not difficult, especially if there was no physical damage that turned the iPhone camera black. We have researched solutions to fix iPhone camera black screen and provided them on this page. You should begin from solution 1 and then go down from there. Your iPhone camera should be fixed before you get to the end of this guide.
Solution 1. Check Your iPhone Case

The most common cause of the black screen showing when you launch your iPhone camera is some kind of obstruction. This happens mainly when you use the phone case of a different model for your iPhone or use the case incorrectly, for example, wearing it upside down. It can cover the lens and make your iPhone camera black. Before you attempt other solutions on this page to fix iPhone camera black screen, first of all, confirm that nothing is obstructing your camera’s view.
Another common obstruction, surprisingly, is your finger. From the way you hold your iPhone, your index or any other finger can cover the camera lens. Basically, to start with, remove every object obstructing your camera’s view.
Solution 2. Clean Off The Camera Lens

If your phone case is not obstructing your iPhone camera, it could still get covered. Not many people take out time to clean the camera of their iPhones. In fact, I have never seen a single person do this. However, it is necessary.
You probably use your iPhone most of the time – day and night, and carry it along everywhere you go. When the iPhone is not in use, it’s either in your pocket, bag, or kept somewhere that was not necessarily cleaned beforehand.
While dirt from your pocket, hands, or other dirty surfaces might not cover your camera entirely, it can blur your photos. Therefore, when troubleshooting, especially your iPhone back camera not working, you should wipe the camera lens with an iPhone cleaning kit.
Solution 3. Turn Off and Turn On the Camera App
Maybe the camera App did not load correctly? Sometimes this can happen to iPhone Apps, and any application that fails to load correctly is bound to be problematic. If you are confident that nothing is physically obstructing the camera, then the camera App might be the problem. To checkmate this issue and fix iPhone camera black screen, your next course of action should be re-opening the camera App. Close the camera App totally and then relaunch it so that it can run this time with no errors.
Press your Home button twice as if you want to switch Apps. For iPhones without a Home button, you should touch the gesture area at the lower side of your screen, swipe up, and keep your finger there until the multitasking interface appears. Next, swipe the camera card up to exit the App. After leaving the camera App, give it a moment and then tap on it to relaunch it. The iPhone camera should work this time. If it does not work, move on to the next solution.
Solution 4. Switch Your Camera to Front (or Back)
This method is more of a quick fix when your iPhone camera is not working. The logic behind this solution is that if you are experiencing the issue on your back camera, it is unlikely that the front camera would also not work. The same goes for the front camera.
First, restart the camera, as we have done in the solution above. When the camera comes back on, if it is set to the rear camera, and the iPhone back camera is not working, tap on the icon on the bottom right-hand corner of your iPhone. This will change the camera to the front one, which should work and probably serve your needs.
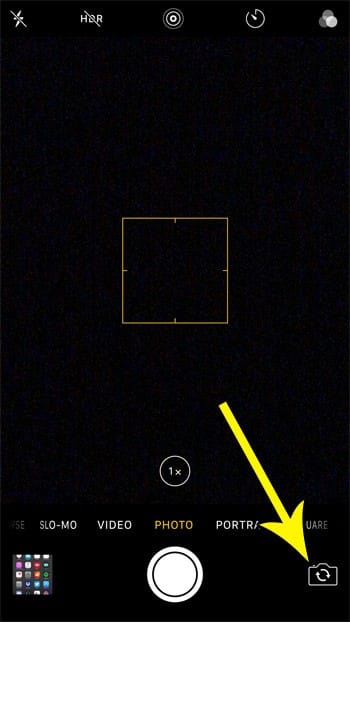
One thing is that this method may be thought not to fix iPhone cameras, but that is far from the truth. Many users have reported that when their iPhone back camera is not working, they can solve the iPhone camera black screen problem if they switch over to the front camera and then back to the rear camera. The same goes for when the iPhone front camera does not work.
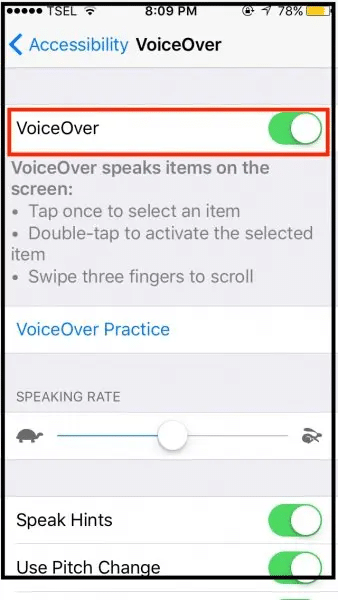
Solution 5. Turn Off the Voiceover Feature
Another factor that users noticed is that the VoiceOver feature can interfere with the camera App. When the VoiceOver feature is enabled, the camera can show a blank screen, or the iPhone camera blacks out. The interference is most likely a bug in iOS.
To be sure that the VoiceOver feature is not the culprit for the camera’s issues, deactivate it and retry using the camera. The VoiceOver activation and deactivation setting are located in the iPhone Settings app. Open “Settings” and select “General.” From the items under “General,” tap “Accessibility” and proceed to disable VoiceOver.
Solution 6. Restart Your iPhone
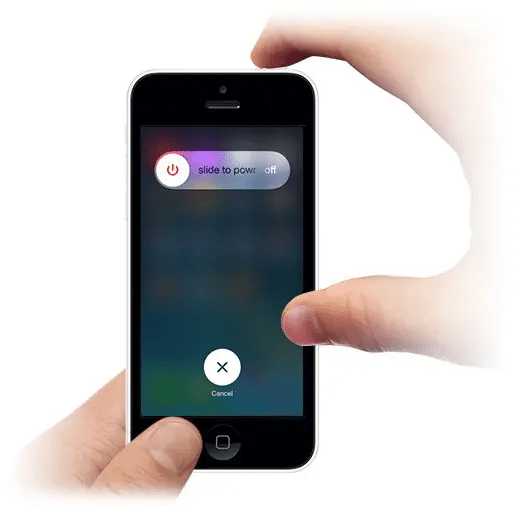
Most iPhone users already know the power of rebooting their devices. Restarting your iPhone alone can repair several issues, and the iPhone camera not working is one of them. Behind the scenes, when you restart an iPhone, the temporary memory gets freed up. These temporary files consist of irrelevant/outdated files and logs, etc. If the problem stems from one of those, you will resolve the issue by restarting your iPhone.
Further, remember the solution where we re-opened the camera App? Restarting your device does the same thing to fix the iPhone camera. It basically restarts all the processes and applications without leaving any room for the one causing the camera not to work.
Solution 7. Reset All Settings on iPhone
Going one step further is the iPhone reset. This solution assumes that you have made a camera setting that is causing the iPhone camera black screen. Either that or there is a bug in your camera application. Resetting all your iPhone settings will restore sound, display, network, and other settings to their default states.
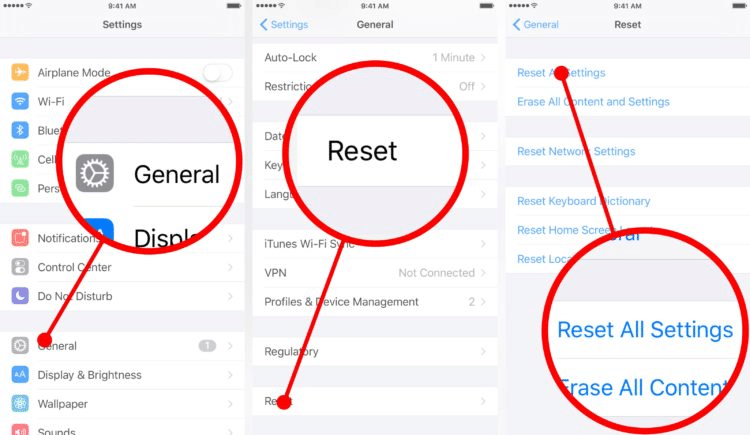
To reset all setting on your iPhone and fix iPhone camera, follow the guide below:
Step 1. From your iPhone Home screen, open the “Settings” app. Next, tap on “General” and select “Reset.”
Step 2. From the options under “Reset,” tap “Reset All Settings.”
Step 3. Next, for security reasons, your iPhone may request that you enter your passcode. Do that when prompted to authorize the operation.
Step 4. Finally, tap on “Reset All Settings” once again to proceed and reset your iPhone.
Solution 8. Fix iPhone Camera Black Problems with an iOS System Recovery
You can skip all of these recovery tips and take the bull by the horn using specialized iOS System Recovery software. For fixing iPhone camera black screen problems without leaving anything to chance, we recommend that you get yourself a professional desktop software known as Tenorshare ReiBoot.
With Tenorshare ReiBoot, you don’t need to try out several solutions and hope for the best. All you have to do is connect your iPhone and run it through a few clicks. Also, this application will fix other issues you may be experiencing on your iPhone. Learn more from our Tenorshare ReiBoot review here.
Key features of Tenorshare ReiBoot:
- It takes only one click for ReiBoot to fix iPhone camera that is not working.
- Apart from your camera problems, Tenorshare ReiBoot has been tested to repair over 50 other iOS issues, such as update errors, iPhone stuck or lagging, etc. Hence, you can use this tool even after you fix iPhone camera.
- Tenorshare ReiBoot also repairs all the latest iPhone modes, including the iPhone 12, 11, 11 Pro, iPhone XS, XS Max, XR, etc. It also supports all iOS versions as well as the latest iOS 14.
- In the course of the operation, your iPhone Apps, music, settings, and all data will remain intact. You incur zero data loss with ReiBoot.
- If you need to enter or exit the iPhone Recovery Mode, bring ReiBoot into the mix, and it does it for you freely with one click.
- It is fully compatible with Windows and Mac PCs. So, whether you use a Windows or Mac computer, there is a Tenorshare ReiBoot version for you.
How to Fix iPhone Camera with Tenorshare ReiBoot
Step 1. Open ReiBoot and select an operational mode
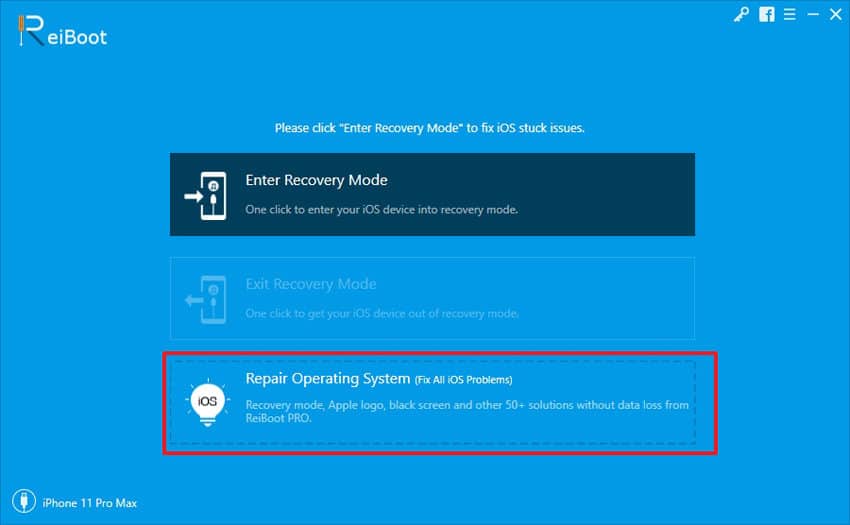
To repair your iPhone front/back camera that is not working, download and install Tenorshare ReiBoot on your PC or Mac and then launch the program. Next, connect your iPhone to the computer using a reliable OEM USB cable. On the first ReiBoot screen, you will see the functions of ReiBoot. From this screen, click on the “Repair Operating System (Fix All iOS Problems)” mode.
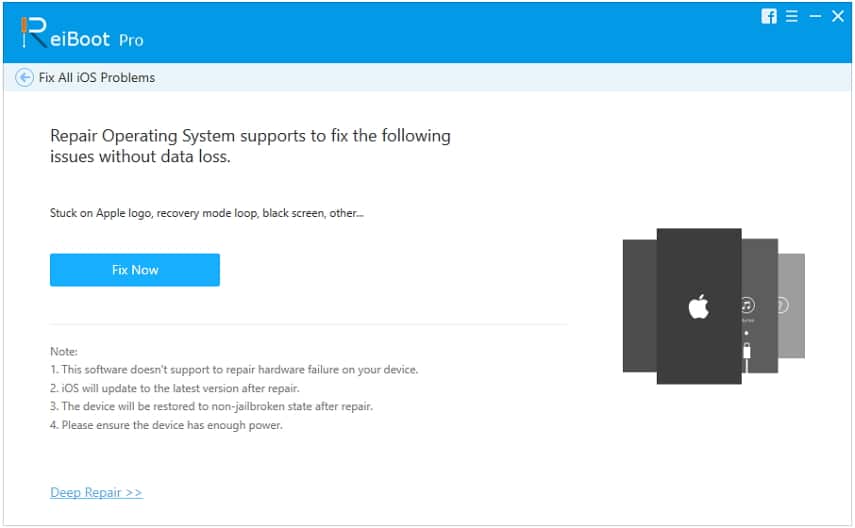
Step 2. Begin the operation
After selecting the “Repair Operating System” mode, the next screen tells you more about the operational mode and warns you of everything that will happen when you proceed with the repair. If you are okay with the terms, continue by clicking the blue “Fix Now” button.
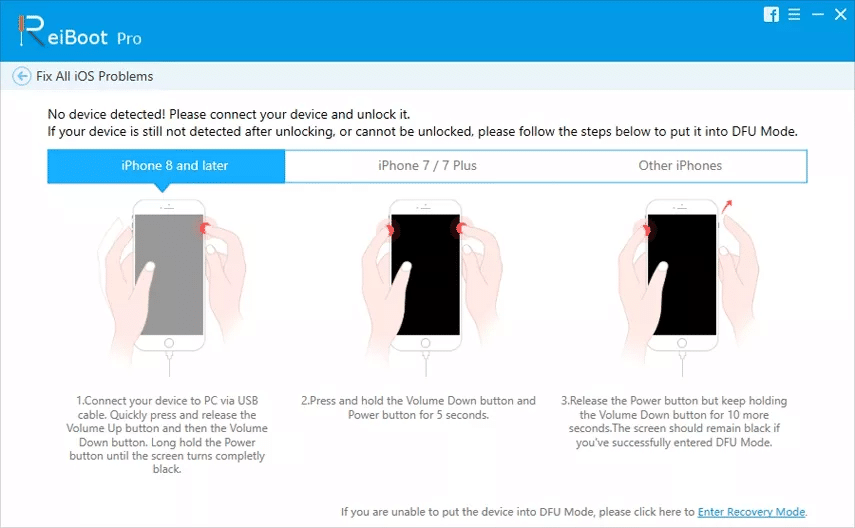
Now, some iPhones will not be detected. If ReiBoot fails to find your device, don’t fret. All you have to do is boot the iPhone into recovery mode and retry. The program will show you a screen with detailed instructions on how to enter Recovery Mode. This screen is pictured below:
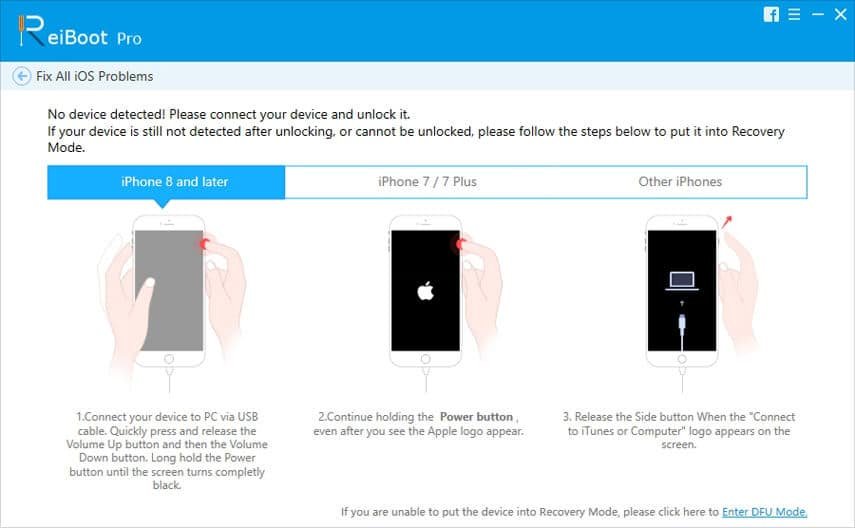
The steps are easy and straightforward; you only have to follow those for your specific iPhone model by navigating the tabs.
If ReiBoot still does not detect your iPhone in Recovery Mode, then the next thing you should do is put the iPhone in the DFU mode. Like the case of Recovery Mode, ReiBoot will display the precise steps on the screen. Follow those steps, and when your computer is finally in DFU mode, the PC will detect it. Below is how to put your iPhone in DFU mode.
Note: It is recommended that you repair your iPhone issues with Tenorshare ReiBoot Pro using the standard system recovery mode. That is because you will not lose your data when you fix the iPhone camera not working.
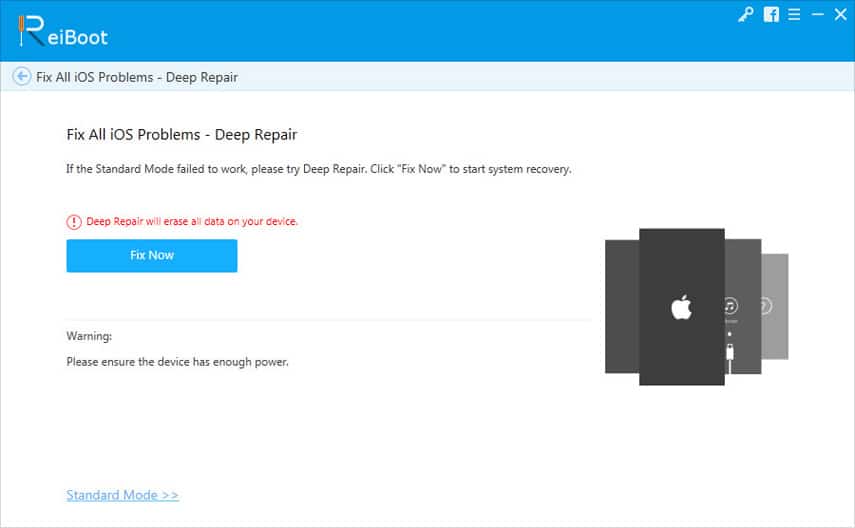
When you get the detection of your iPhone, click “Fix Now.” If Tenorshare ReiBoot still does not work up to this time, resolve the issue by returning the first step on this guide and starting afresh. But on the first step, select the “Deep Repair” mode instead.
Step 3. Get the iOS firmware package
The next step of repairing your camera using Tenorshare ReiBoot is to download the iOS firmware package. This downloading happens straight from the application interface. To get the firmware package next, hit the “Download” button.
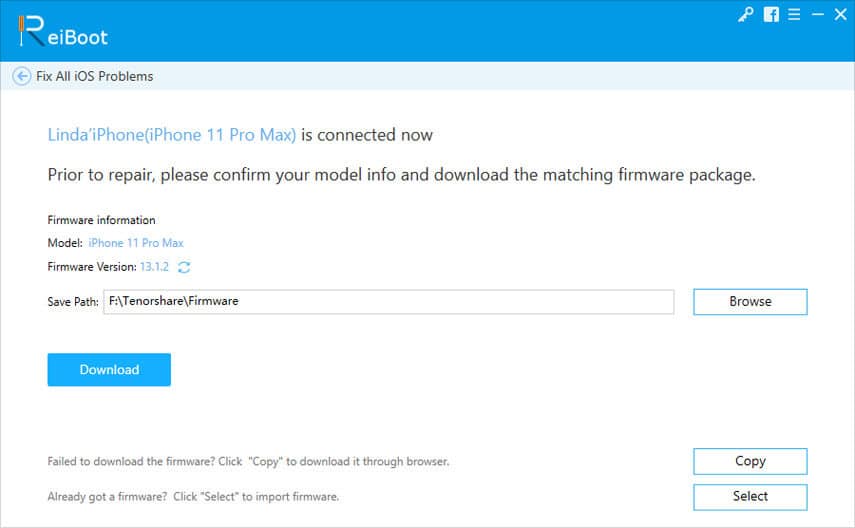
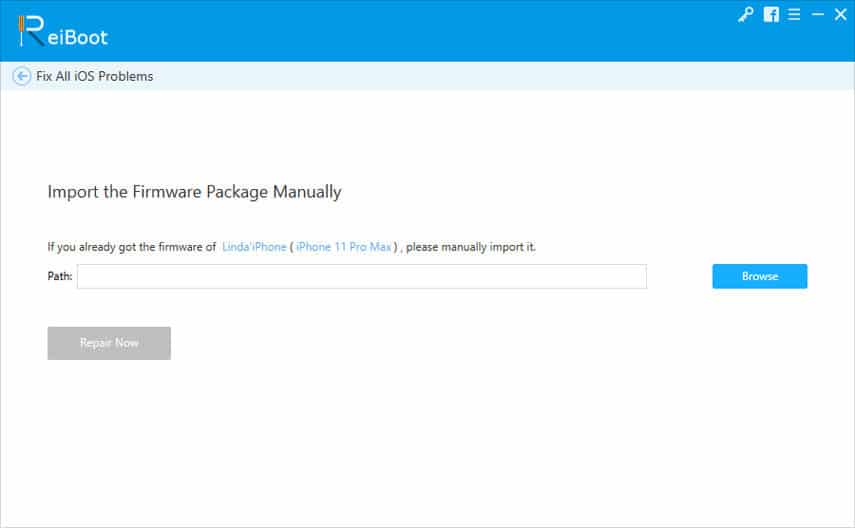
If you already have a firmware package already saved on your computer, click “Select” and import it to Tenorshare ReiBoot. Alternatively, click “Copy” to copy the download link to your clipboard. Paste this link in any web browser to find and download the iOS firmware package online.
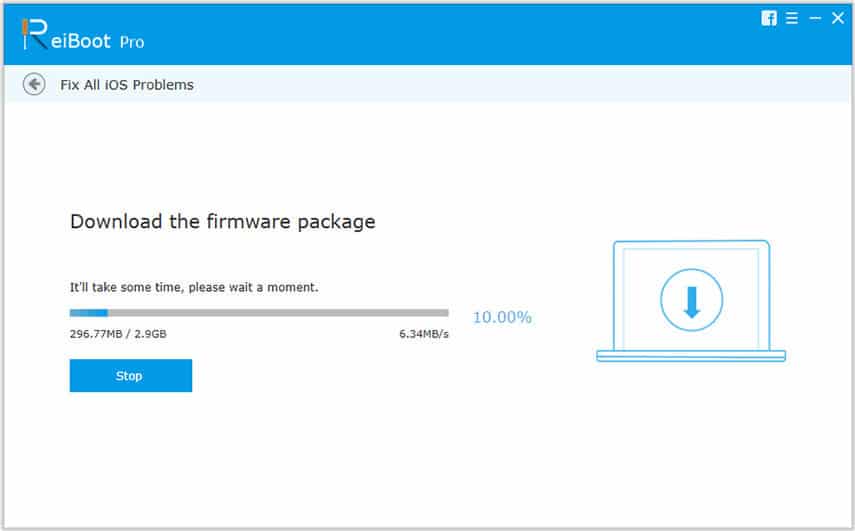
After you get hold of the firmware package for your iPhone, the downloading progress will be displayed on the screen. You can cancel it at any time by clicking on the “Stop” button.
Step 4. Fix your iPhone camera
Finally, you are set to repair the iPhone camera black screen problem. When you finish downloading the firmware package to your PC, to begin the process of fixing your iPhone issues, click on the “Repair Now” button. Your iPhone will now go through a series of operations, and you will see every step on the screen.
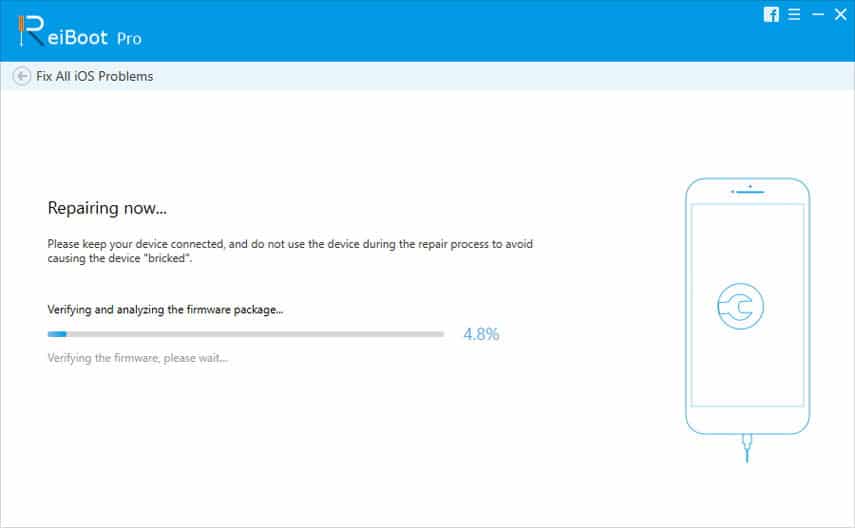
Now, you have to stay patient as ReiBoot gets the job done. Typically, you need nothing more than 10 minutes; during this time, keep your iPhone connected to the PC or Mac throughout the operation. In no time, you will get the screen below, which says, “The repair process is completed.”
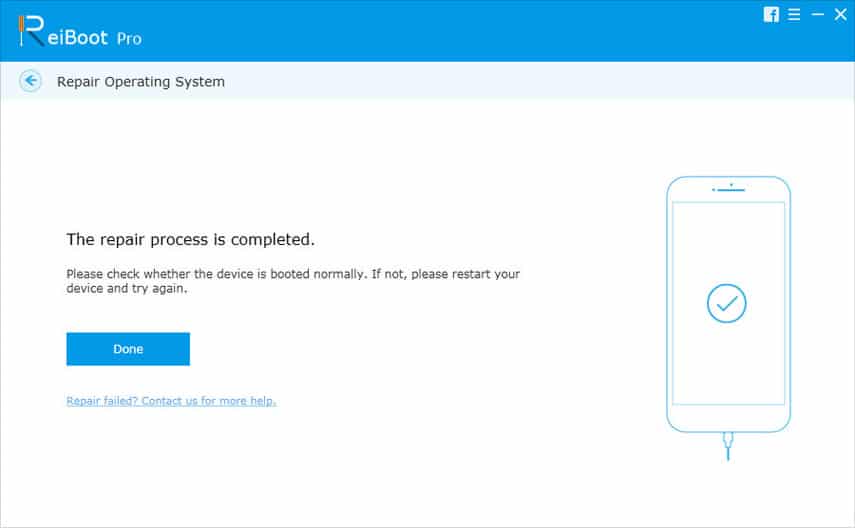
On successful completion, the iPhone reboots and should now set it up. After setting up the iPhone, the first thing you should do is to confirm that the camera now works correctly.
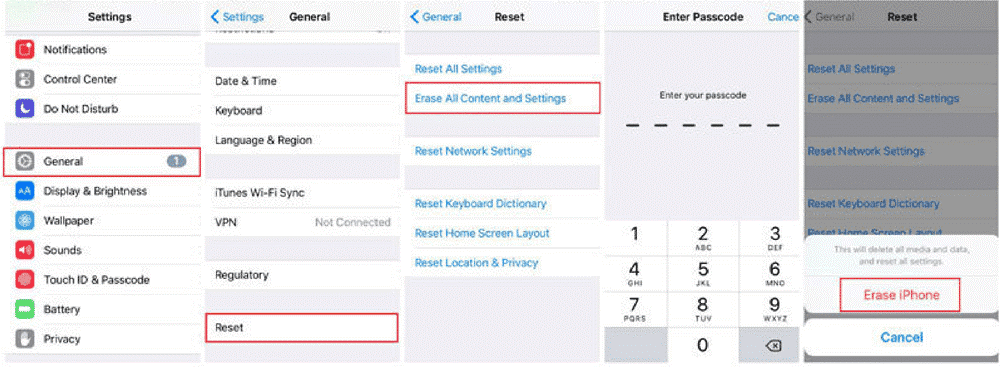
Solution 9. Erase All Content and Settings on iPhone
As a last resort, if you have tried every solution here and even used the software above but no joy, then erasing your iPhone should work. If you have a recent backup, then go ahead and do this. However, if you don’t, you must backup your iPhone first or risk losing everything on your device.
To wipe your iPhone, open the Settings app. tap on “General,” select “Reset,” and tap “Erase All Content and Settings.” On tapping this option, the iPhone will demand that you enter your passcode. Confirm the operation by entering the passcode. Finally, tap “Erase iPhone.” Once you do that, your device starts getting wiped in the background.
Conclusion:
Did any of the solutions provided here help you fix your iPhone camera black screen? After finding fixed iPhone camera issues, users usually realize that the iPhone front/back camera not working was not a significant problem.
However, resetting the iPhone, erasing all content, and using Tenorshare ReiBoot will get you through the major problems. The Tenorshare ReiBoot method is recommended because it solves all kinds of issues, and you are not risking your data when you use this software.

