
Every once in a while, we have to capture screenshots and share them with friends, family, or even technical support. Of course, a simple screenshot would do a better job than our sloppy explanation of what happens on the screen. This is why almost all Operating Systems come with a built-in option to capture screenshots. iOS isn’t so different.
In case you didn’t know, both iOS and iPadOS has a built-in screenshot engine. With every version of iOS, it has received updates and more features as well. Recently, with the launch of the new-gen iPhone devices to the market, Apple had to change the process of taking a screenshot on the iPhone. So, those who are entirely new to the iPhone ecosystem are a little confused about this.
Therefore, we decided to create a no-brainer guide on how to take a screenshot on an iPhone 12, 11, X, XR, SE 2020, 8, 7, 6s, SE, 6, 5, and the iPhone 4. We have categorized the tutorials into groups by devices where you can follow the same steps. Rest assured, we have covered the right steps for almost every iPhone model that you have.
How to Take a Screenshot on iPhone 12, 11, and X Series Devices?
If you have the following iPhone models with you, this tutorial is for you.
- iPhone 12 Mini
- iPhone 12
- iPhone 12 Pro
- iPhone 12 Pro Max
- iPhone 11
- iPhone 11 Pro
- iPhone 11 Pro Max
- iPhone X
- iPhone XS
- iPhone XS Max
- iPhone XR
To take a screenshot on these devices, you have to,
- Press the Side and Volume Up buttons at the same time.
- As soon as you hear the captured sound, release the buttons.
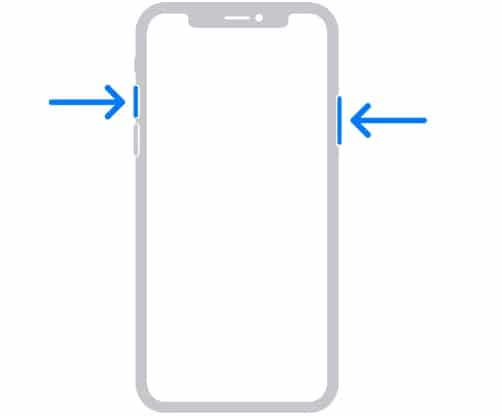
- You should be able to see the screenshot pop-up on the bottom-left part of the screen.
You can leave this pop-up alone if you want to save the screenshot to Photos. If you want to make changes to the screenshot, you can open the screenshot and use the standard editing features.
How to Take a Screenshot on iPhone SE 2020, iPhone 8/8 Plus/7/6S/6
However, if you have any of the iPhone models listed below, you can follow this tutorial.
- iPhone SE 2nd-generation
- iPhone 8
- iPhone 8 Plus
- iPhone 7
- iPhone 7 Plus
- iPhone 6s
- iPhone 6s Plus
- iPhone 6
- iPhone 6 Plus
On these devices, you can find the power button on the side. So,
- You have to press the Side button and the Home button simultaneously.
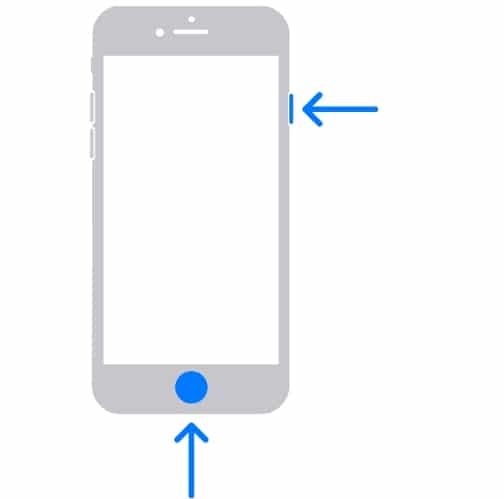
- When you hear the captured sound, release button buttons.
Just like earlier, you should see a screenshot pop-up on the bottom left. You will be able to make changes to the screenshot or dismiss it.
How to Take a Screenshot on iPhone SE 1st Gen, 5 and 4
In case you still have the following iPhone models, you have to follow a slightly different method.
- iPhone 5s
- iPhone 5c
- iPhone 5
- iPhone 4S
- iPhone 4
On these devices, you can find the power button on the top of the device. Therefore, to take a screenshot,
- You can press the Home button and the Power button at the same time.
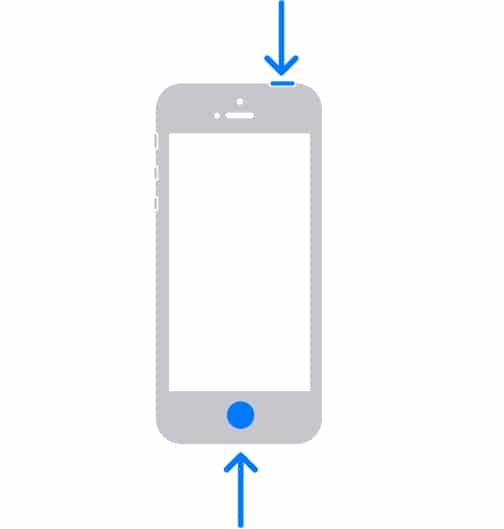
- Release the buttons when you hear the shutter sound.
Depending on the version of iOS the device has, you may be able to edit and discard the screenshot pop-up with ease.
How to Take a Screenshot on iPhone Using Assistive Touch?
As you can see, the button combinations to take a screenshot on an iPhone are not that great. This might be a problem when you want to take a large number of screenshots. Thankfully, you can set up AssistiveTouch to help you.
AssistiveTouch is an accessibility-focused iOS feature that can help people who have difficulty touching all parts of the screen. Once you have enabled this feature, a small icon would lay on top of the iOS UI all the time. You can tap on this icon to launch a sub-menu and perform actions.
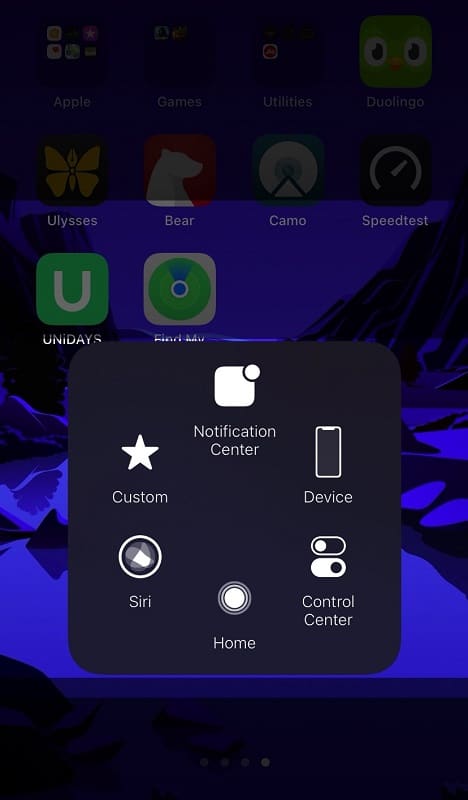
By default, AssistiveTouch comes with a few navigation options: Home, Siri, Control Center, Device, and the Notification Center. However, you have the opportunity to rearrange these options and configure a Custom button as per your needs.
By setting up that custom button to capture a screenshot, you can make the whole process easier.
You can follow the steps given below to make this work:
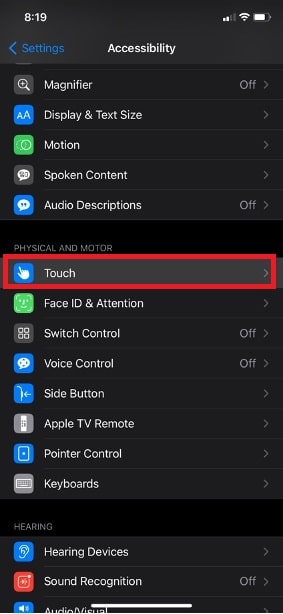
Step 1. Go to Settings and choose Accessibility from the options.

Step 2. From the upcoming menu, choose Touch.
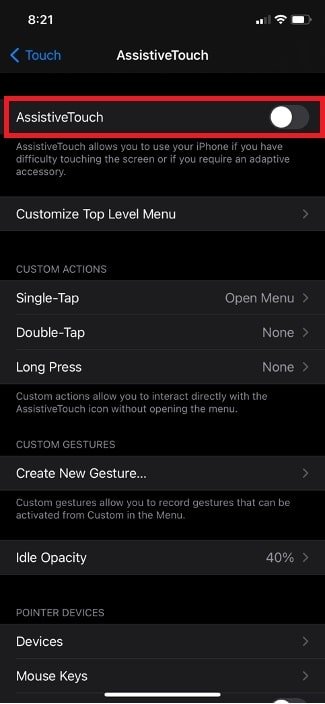
Step 3. On the next screen, tap on the option named AssistiveTouch.

Step 4. You can then see the AssistiveTouch menu, where customization options are also available.
Step 5. First, you have to enable AssistiveTouch.
Step 6. Now, tap on the option named Customize Top Level Menu.
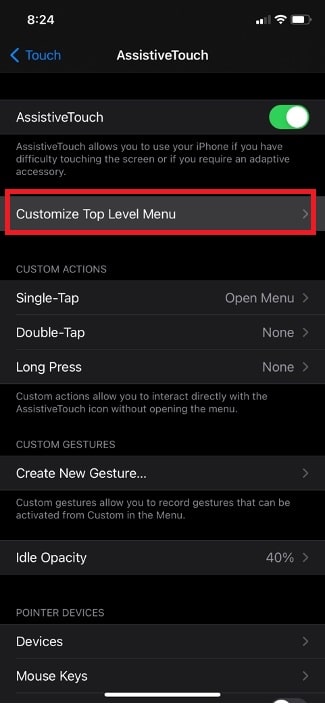
Step 7. On the next screen, you can control which icons appear on the AssistiveTouch menu.
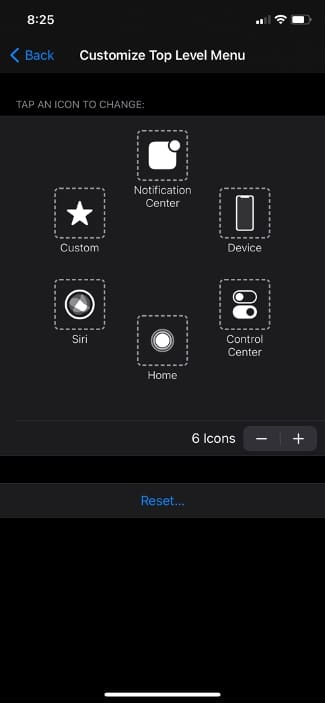
Step 8. Now, tap on the Custom icon to change the action.
![]()
Step 9. From the upcoming menu, choose Screenshot.
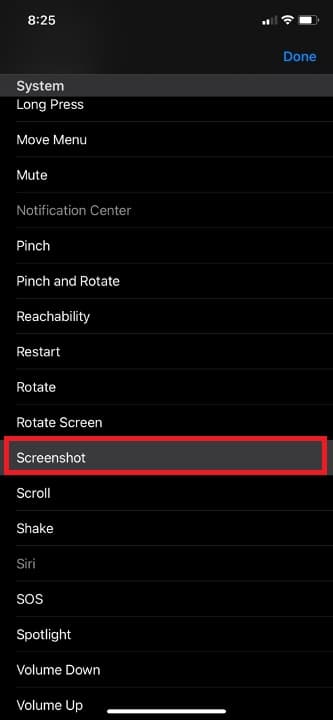
Step 10. Tap Done to continue.
That’s it. You have set up the Screenshot command on the AssistiveTouch menu.
Now, when you want to capture a screenshot, you can launch the AssistiveTouch menu and tap the icon named Screenshot.
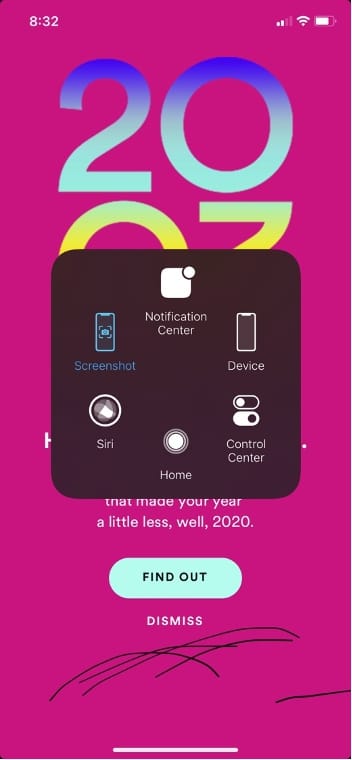
This is way simpler than having to press multiple buttons at once. iOS has designed AssistiveTouch to stay on top of all interfaces without interrupting your workflow. For instance, when you capture a screenshot via this method, the AssistiveTouch button will not be present on the image.
By the way, you can set up the Screenshot action by long-pressing or double-tapping on the AssistiveTouch button. To do this, you can choose the corresponding options from the AssistiveTouch menu. Setting this up will help you capture a screenshot without launching the AssistiveTouch sub-menu.
For instance, I have set up AssistiveTouch to capture a screenshot when a long-press on the button.
How to Take a Screenshot on iPhone Using Siri?
Did you know that Siri can help you capture screenshots on the iPhone? Well, you have all the more reason since Siri has become so minimal with the launch of iOS 14. That is, you can send a screen-capture request, and Siri would not take up your entire screen.
This is probably the easiest way to take a screenshot.
You have to trigger Siri by either saying ‘Hey Siri’ or holding the Home/Side button, depending on the iPhone model you use.
Now, ask Siri to ‘take a screenshot.’
The digital assistant will take a screenshot of the current screen and automatically save it. This method works on almost all screens, including the Lock Screen.
How to Take a Screenshot on iPhone using Back Tap?
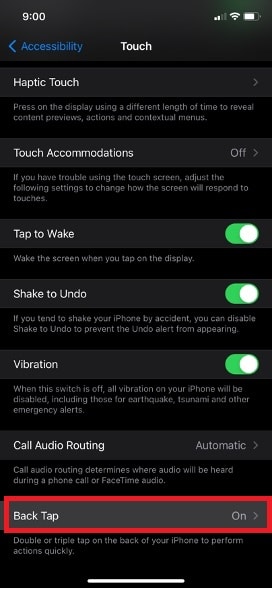
Back Tap is another accessibility feature in iOS that makes the back panel of your iPhone a physical button. You can configure the tap on the back of the phone to perform many tasks, including capturing a screenshot. To do this,
Step 1. Go to Settings and choose Accessibility.
Step 2. From the menu, choose Touch.
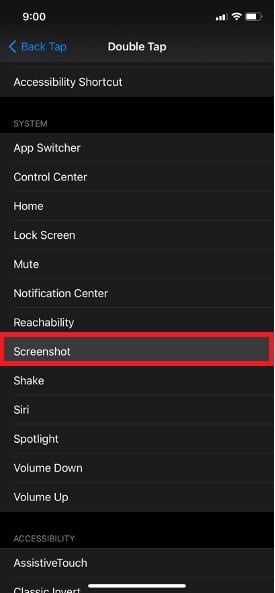
Step 3. From the upcoming menu, you have to pick Back Tap.
Step 4. You can see two options on the screen: Double Tap and Triple Tap.

Step 5. Choose the convenient one and pick Screenshot as the action from the menu you see after.
Please keep in mind that Back Tap works on iPhone 8 and later models, and the device must have installed iOS 14 on it. We also noticed that the option doesn’t work smoothly when you use a rugged protective case on your iPhone.
Otherwise, Back Tap gets the job done.
How to View Screenshots on iPhone?
Now that you have captured the right screenshots, how do you view them? Well, there are two options.
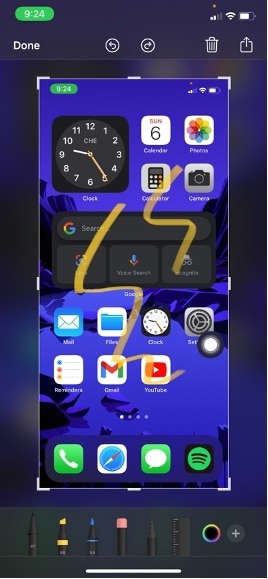
Option 1. When you capture a screenshot, the pop-up would appear on the bottom-left part of the screen. You can tap on this pop-up, which would expand the screenshot. Here, you can make some changes like cropping, markup, and drawing. You can tap on the Done button to save it in Photos or Files.
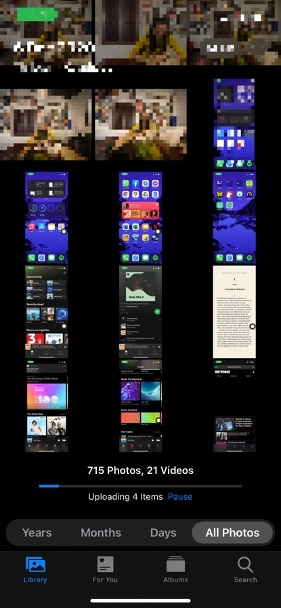
Option 2. If you don’t open the pop-up, your iPhone will save the screenshot on Photos. So, you can go ahead and open Photos on your iPhone. Here, you will be able to edit the screenshots as standard images and share them via other apps.
Remember that you may have fewer features in this department if you are using an older version of iOS.
The Bottom Line
We believe our guide helped you to master the process of taking a screenshot on iPhone 11, iPhone 12, and other models out there. We have listed some features that are exclusive to the newer models of the iPhone or the latest version of iOS.
At the same time, if you recently upgraded your iPhone to a new model, you could use virtually any method we have listed above. If you ask us, Back Tap and AssistiveTouch menu are our favorite choices in terms of convenience.

